


Hitron ARIA 2210 Wi-Fi Router Setup Guide
How to Set Up Your Wakey ARIA 2210 Wi-Fi Router
The Hitron ARIA 2210 is a Wi-Fi router and mesh system provided with select Wakey Internet services. Follow the steps below to connect your ARIA to your modem, configure your Wi-Fi network and add additional ARIA units as mesh extenders if needed.
Important — Your Modem Should Be Online First
Before setting up the ARIA 2210, make sure your Wakey Internet modem is fully connected and online. The router needs an active connection from the modem to complete setup.
Prefer to Watch? Follow Along With Our Setup Video
This quick video walks through setting up your ARIA 2210 in Router Mode.
What Your Setup Will Look Like
Coax Outlet → Wakey Modem → ARIA 2210 → Your Wi-Fi Devices
Your modem connects to the Wakey network. Your ARIA 2210 then creates and manages the Wi-Fi network inside your home.
Step 1 — Connect the ARIA 2210 to Your Modem
Connect Your Router
1 — Connect Power
Connect the ARIA 2210 to its power adapter and plug it into a power outlet.
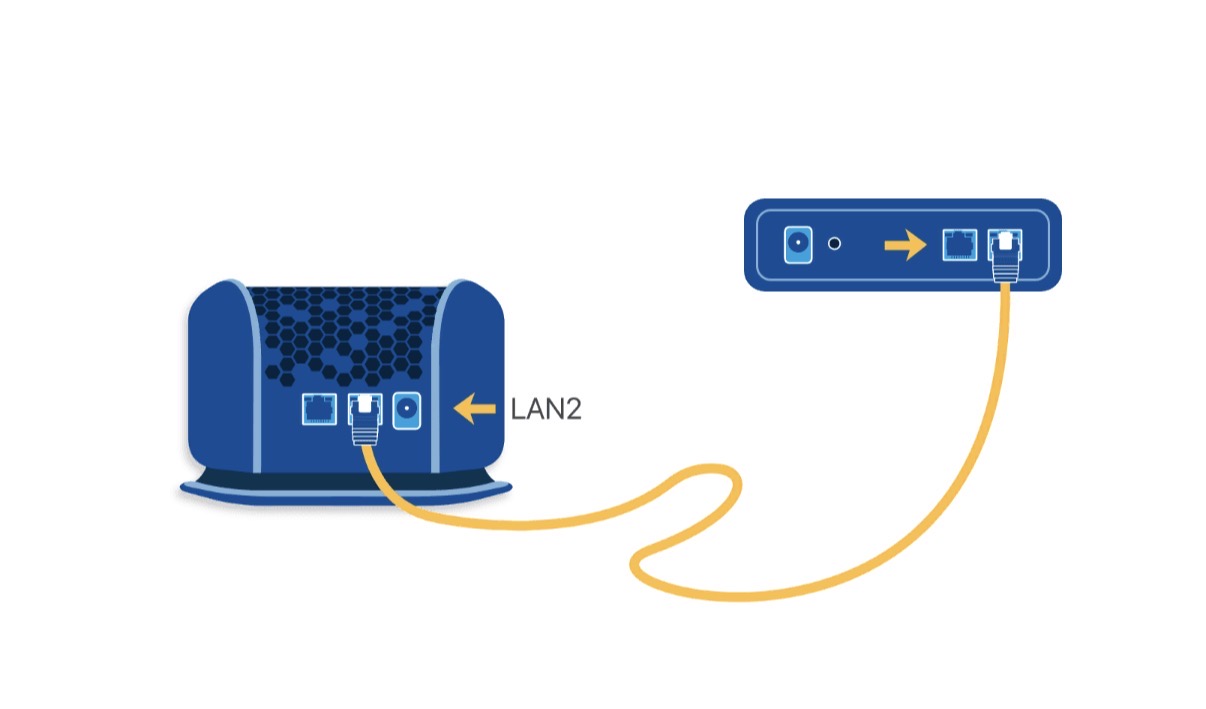
2 — Connect Ethernet
Connect an Ethernet cable from:
Modem LAN 1 → ARIA 2210 LAN 2
3 — Wait for the ARIA to Start
Allow the ARIA 2210 to completely boot. When it is ready for initial configuration, the LED should begin slowly flashing/pulsing white.
Important — The ARIA Should Be the Only Device Connected to the Modem
For Wakey standalone cable modems, connect the ARIA 2210 to LAN Port 1 on the modem.
The modem’s second Ethernet port, if present, should remain unused. Connecting another router, computer or device directly to the modem may cause connection instability, drops or performance issues.
Step 2 — Make Sure the ARIA Is Ready for Setup
Slow Flashing White = Ready to Configure
Before continuing, look at the LED on your ARIA 2210.
Slow Flashing / Pulsing White = Ready for Setup
Once the ARIA is slowly flashing white, it should begin broadcasting its temporary EasyConnect Wi-Fi network and you can continue with setup.
Not Flashing White? Factory Reset the ARIA
If the ARIA 2210 is not slowly flashing/pulsing white, it may already contain a previous configuration. We recommend returning it to its factory settings before continuing.
Factory Reset the ARIA 2210:
- Keep the ARIA connected to power.
- Locate the recessed RESET button on the unit.
- Using a paper clip or pin, press and hold the RESET button for approximately 15 seconds.
- Release the RESET button. The ARIA should power-cycle and restart automatically.
- Allow the router several minutes to completely restart.
Wait for the LED to begin slowly flashing white. Once it does, your ARIA 2210 is ready to be configured.
You should also see the temporary HitronXXXXX-EasyConnect Wi-Fi network appear on your phone, tablet or computer.
Step 3 — Connect to the ARIA EasyConnect Network
Once the ARIA is slowly flashing white, use a phone, tablet or computer to connect to its temporary setup network.
Connect to EasyConnect
1 — Open Wi-Fi Settings
Open the Wi-Fi settings on your phone, tablet or computer.
2 — Find Your ARIA
Look for the Wi-Fi network that matches the information on the label underneath your ARIA 2210.
HitronXXXXX-EasyConnect
3 — Connect
The EasyConnect network may appear as Unsecured, Sign-in Required or Connected, No Internet during setup.
Don’t panic — this is normal. Wait for your device to completely connect before continuing.
“Unsecured” During Setup Is Normal
The EasyConnect network is only used to configure the router. During setup it may not behave like a normal secured Wi-Fi network. You’ll create your permanent Wi-Fi name and password later in this guide.
Step 4 — Open the ARIA Setup Page
The Setup Page May Open Automatically
Once connected to the EasyConnect network, the ARIA setup page should normally appear automatically.
Give it a few seconds after your device finishes connecting.
Nothing appeared?
Open your Internet browser and visit:
192.168.0.1
Once the setup page loads, you’re ready to configure the ARIA.
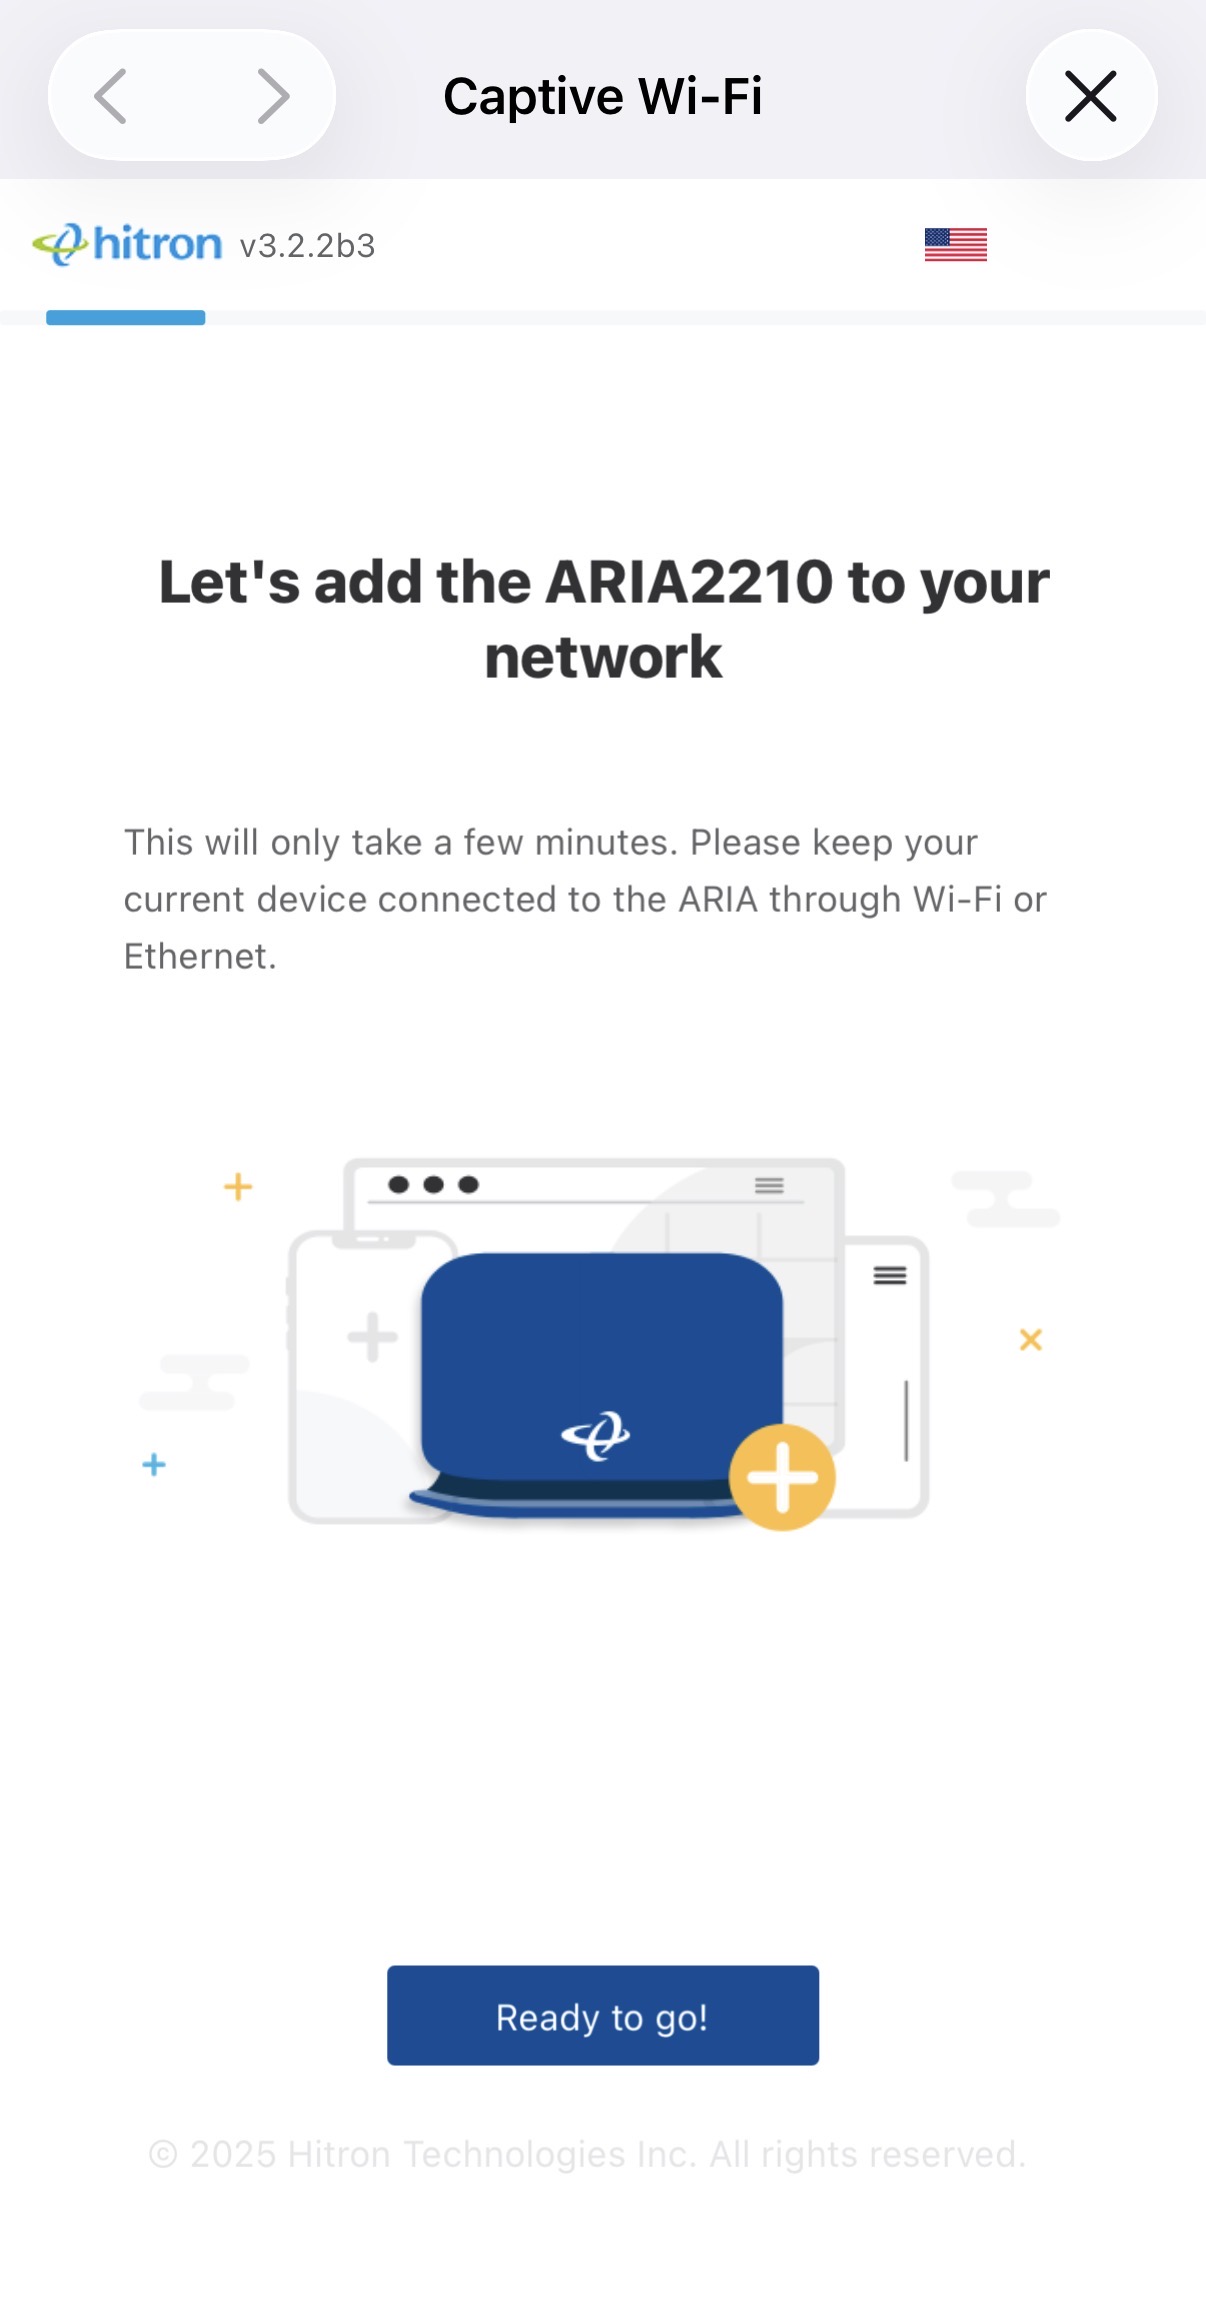
Step 5 — Let’s Add the ARIA to Your Network
Ready to Go!
On the first ARIA setup screen, select:
Ready to go!
The setup wizard will now guide you through configuring your ARIA 2210.
Step 6 — Confirm the ARIA Light
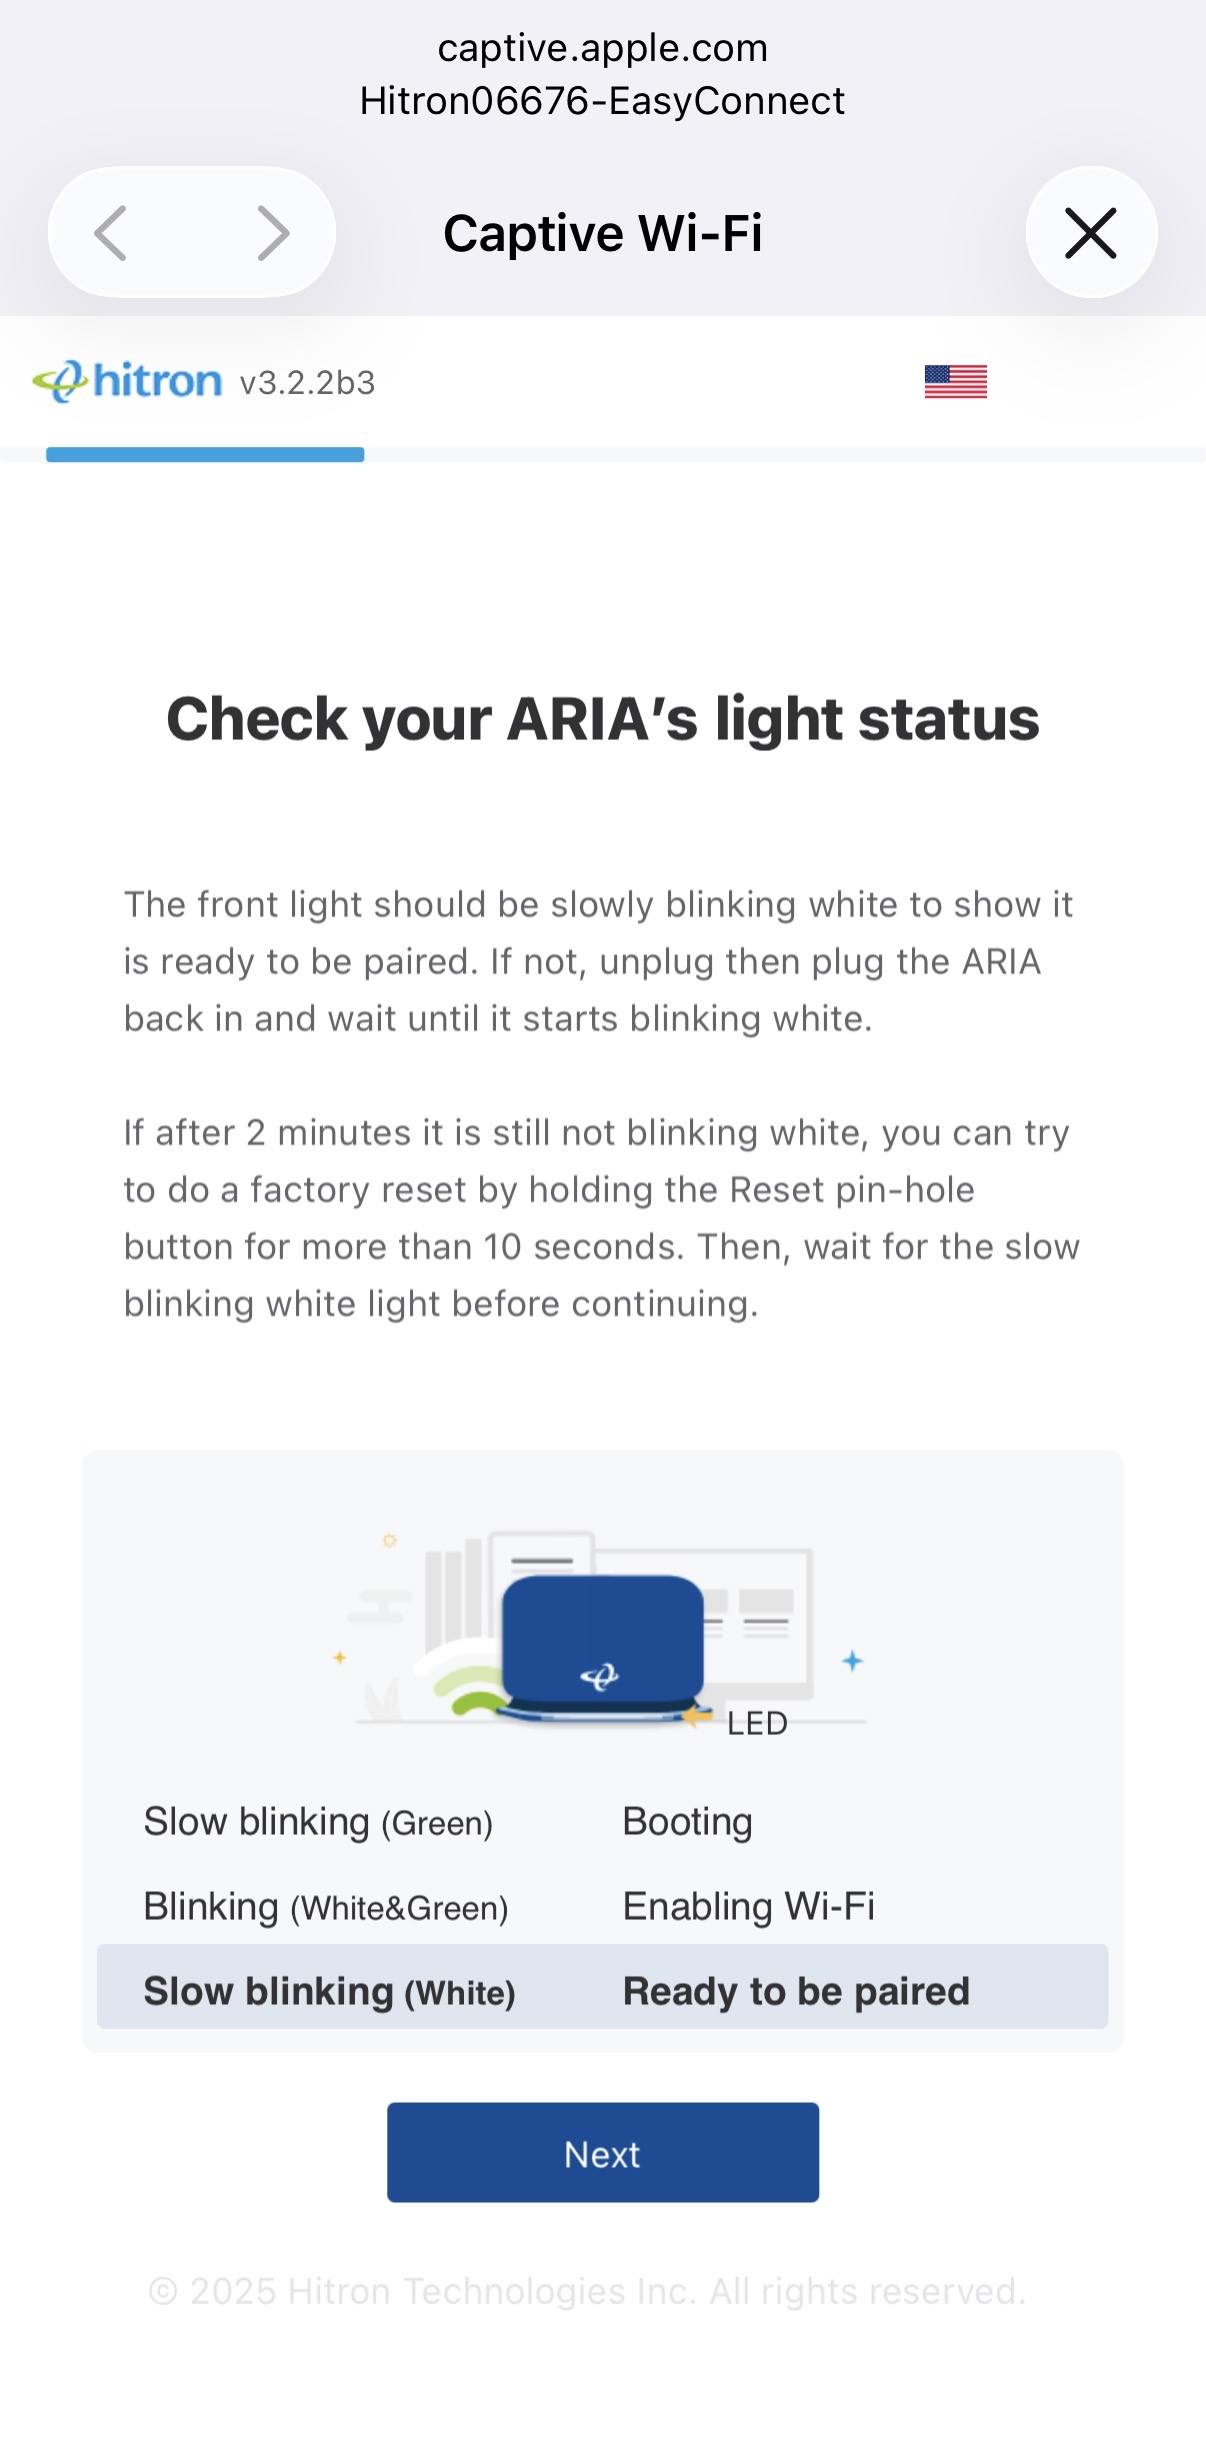
Still Flashing White? Perfect.
Confirm that the ARIA 2210 LED is still slowly flashing/pulsing white.
Once confirmed, select Next.
See “No DHCP IP Detected”?
Don’t worry — keep everything connected as it is.
- Leave the Ethernet connection between the modem and ARIA in place.
- Reset/restart the modem as directed for your modem model.
- Allow approximately 2–3 minutes for the modem to reconnect.
- Wait for the modem’s Online / Globe light to become solid.
- Return to the ARIA setup page and select Next to retry.
The modem needs to be fully online before the ARIA can receive its Internet connection.
Step 7 — Configure the ARIA as a Router
Important — This Step Is Critical
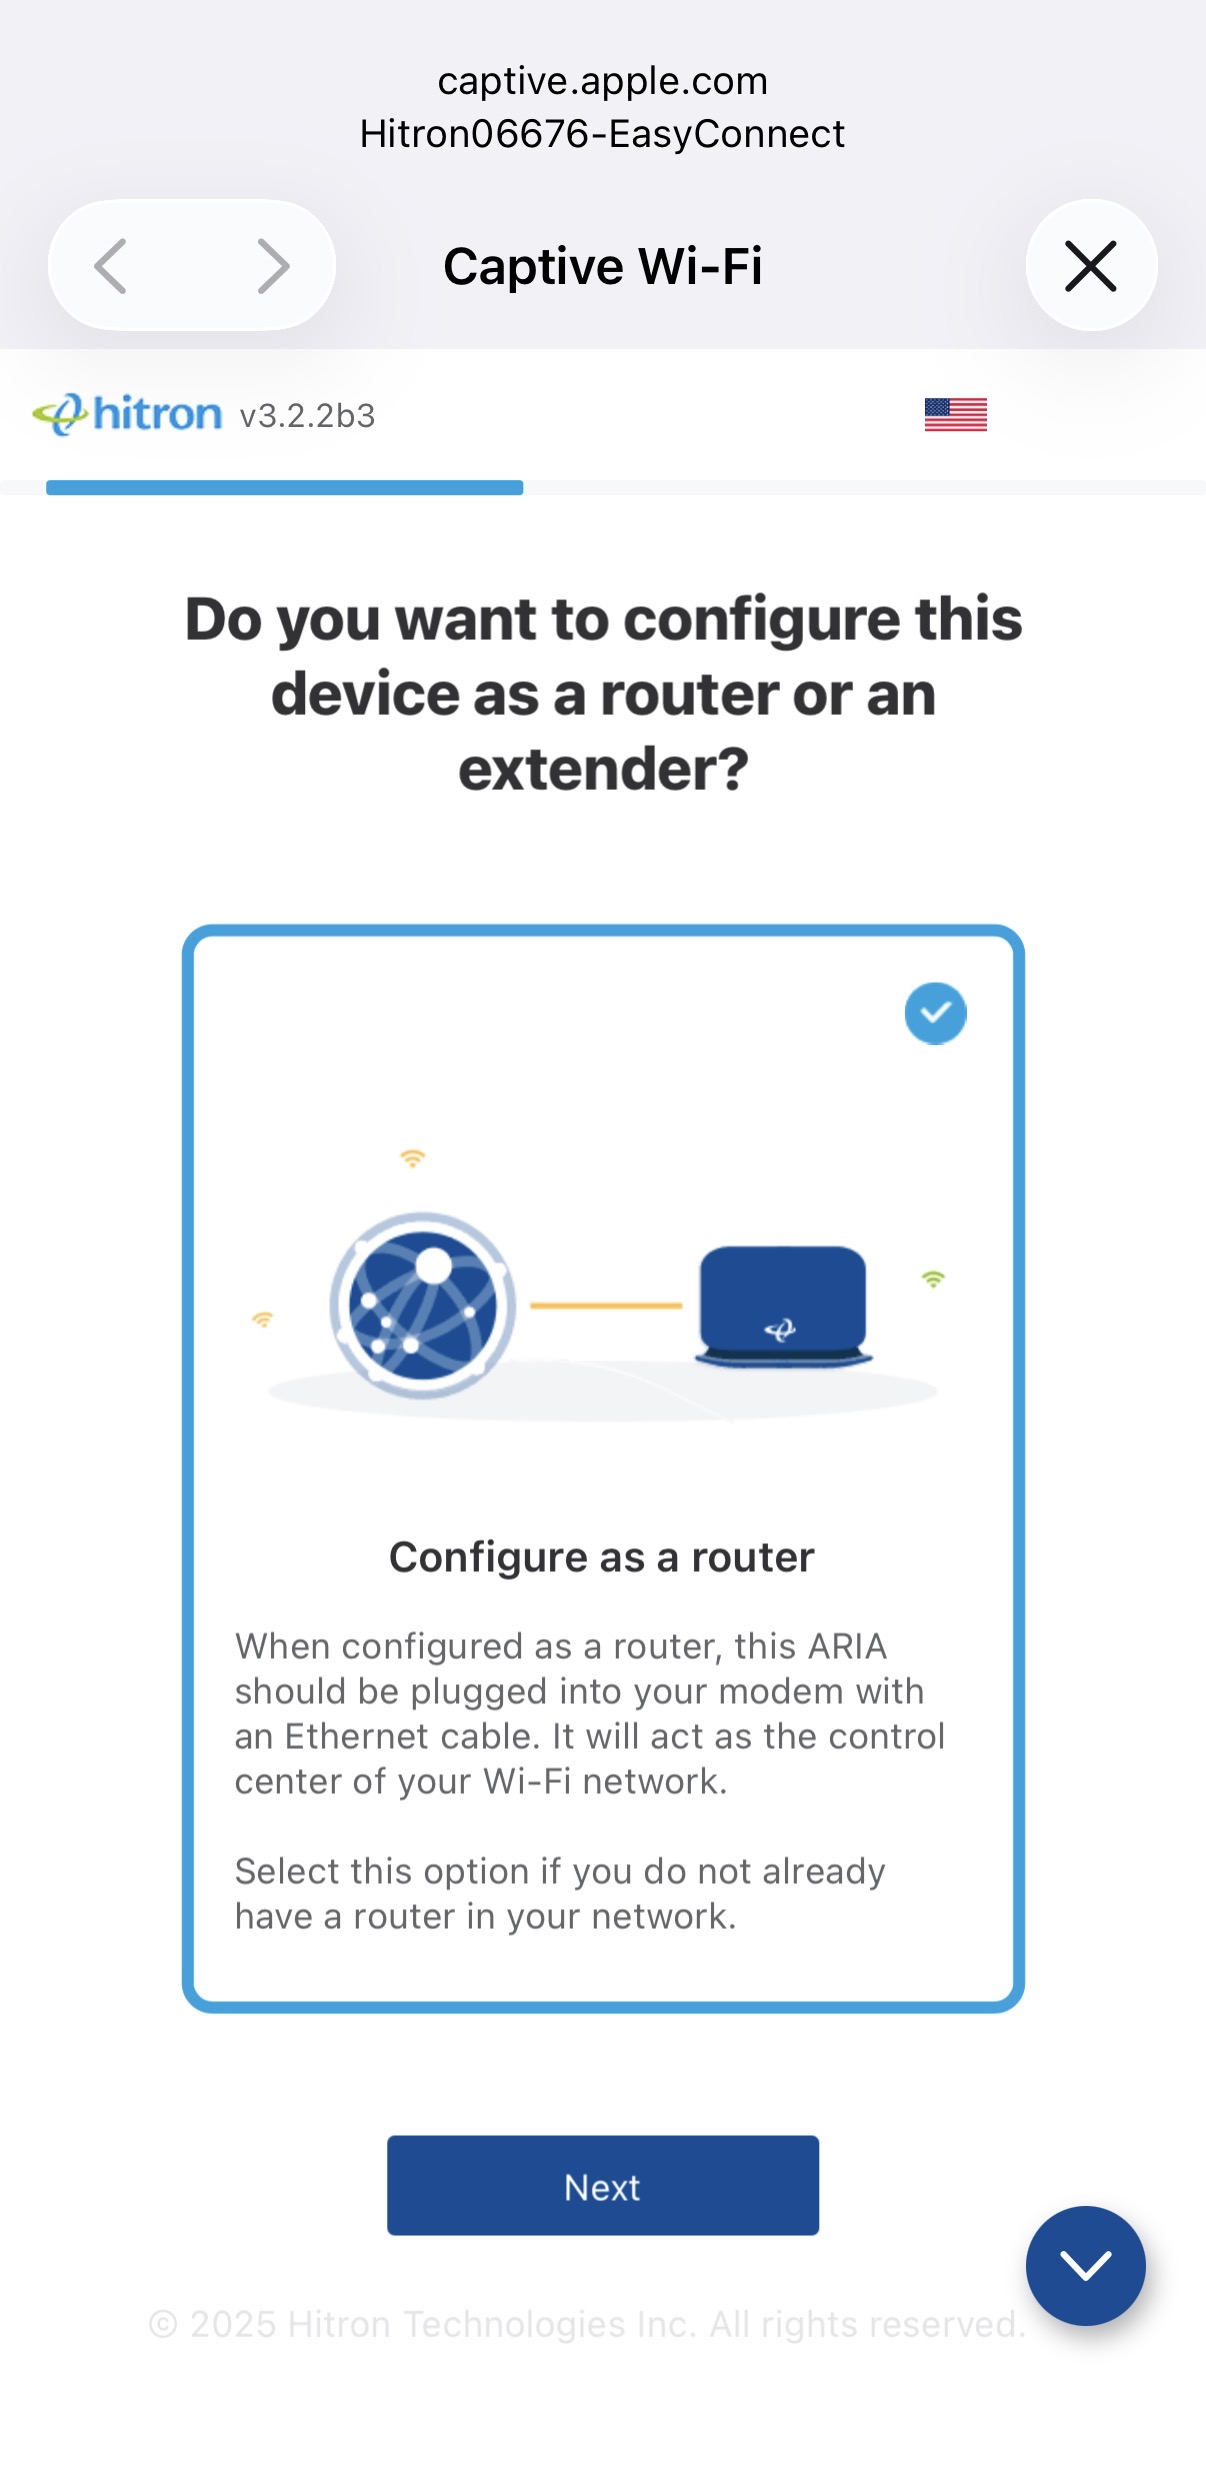
For your main ARIA 2210, make sure you select:
Configure as a Router
A blue check mark should appear beside the selected option.
Configure as an Extender may sometimes be selected by default. Do not use Extender mode for your main ARIA connected directly to the modem.
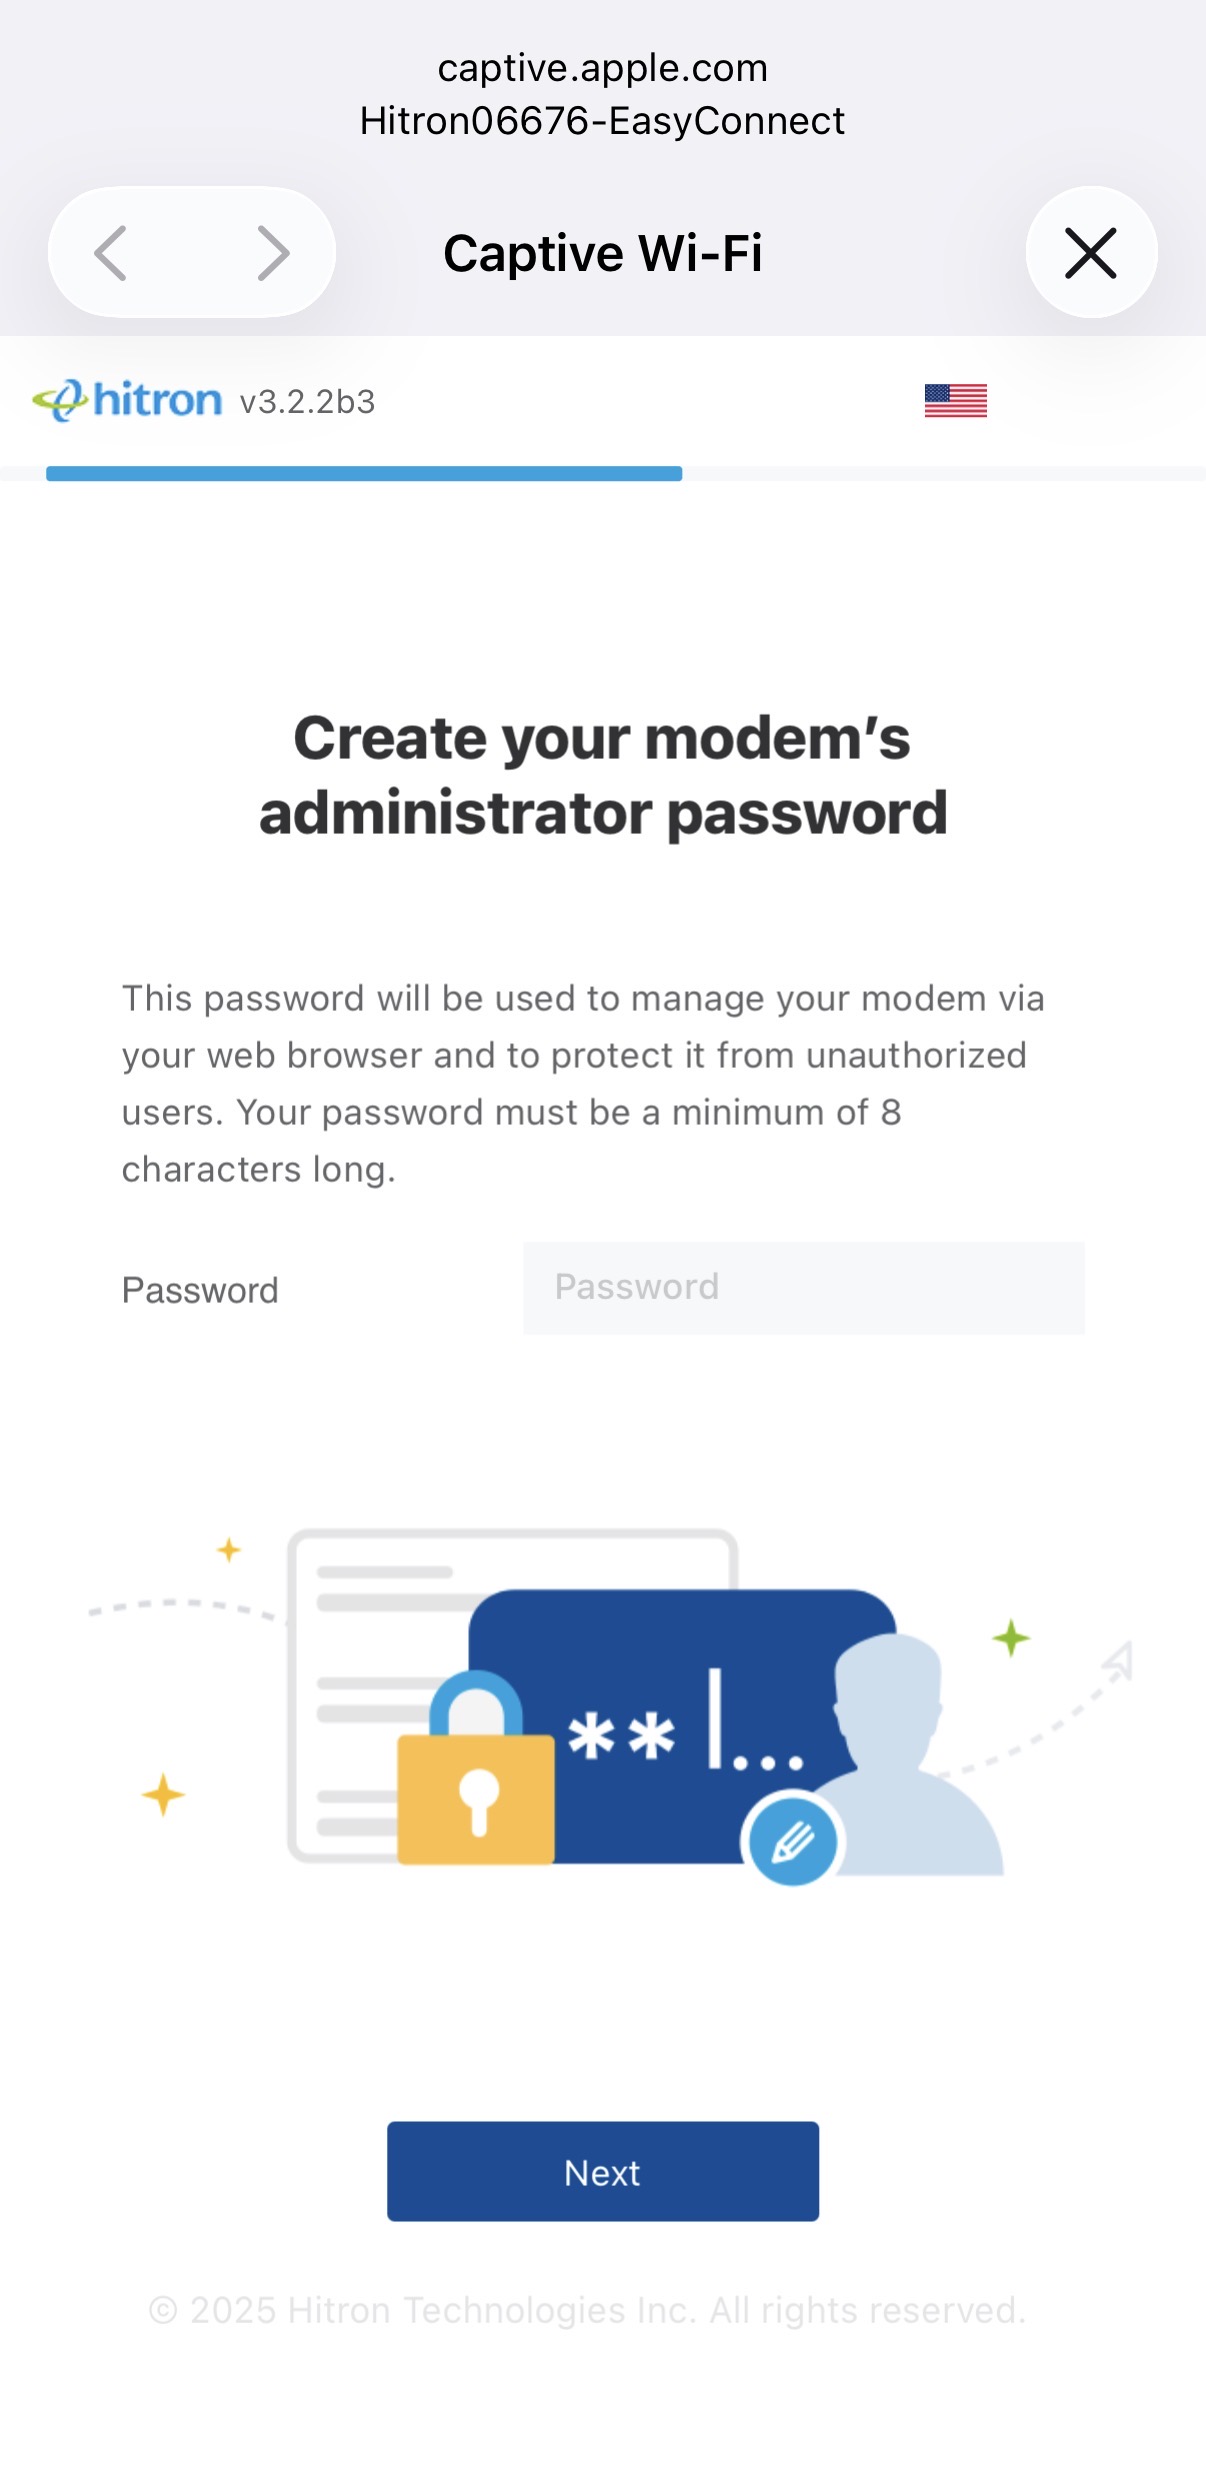
Step 8 — Create Your Router Administrator Password
Create Your Admin Password
Follow the instructions on the setup page to create an administrator password for your ARIA 2210.
This password is used to access your router’s configuration and advanced settings.
Important: Your router administrator password is separate from the Wi-Fi password you’ll create in the next step.
Once you’ve created your administrator password, select Next.
Step 9 — Create Your Wi-Fi Network
Make Your Wi-Fi Yours
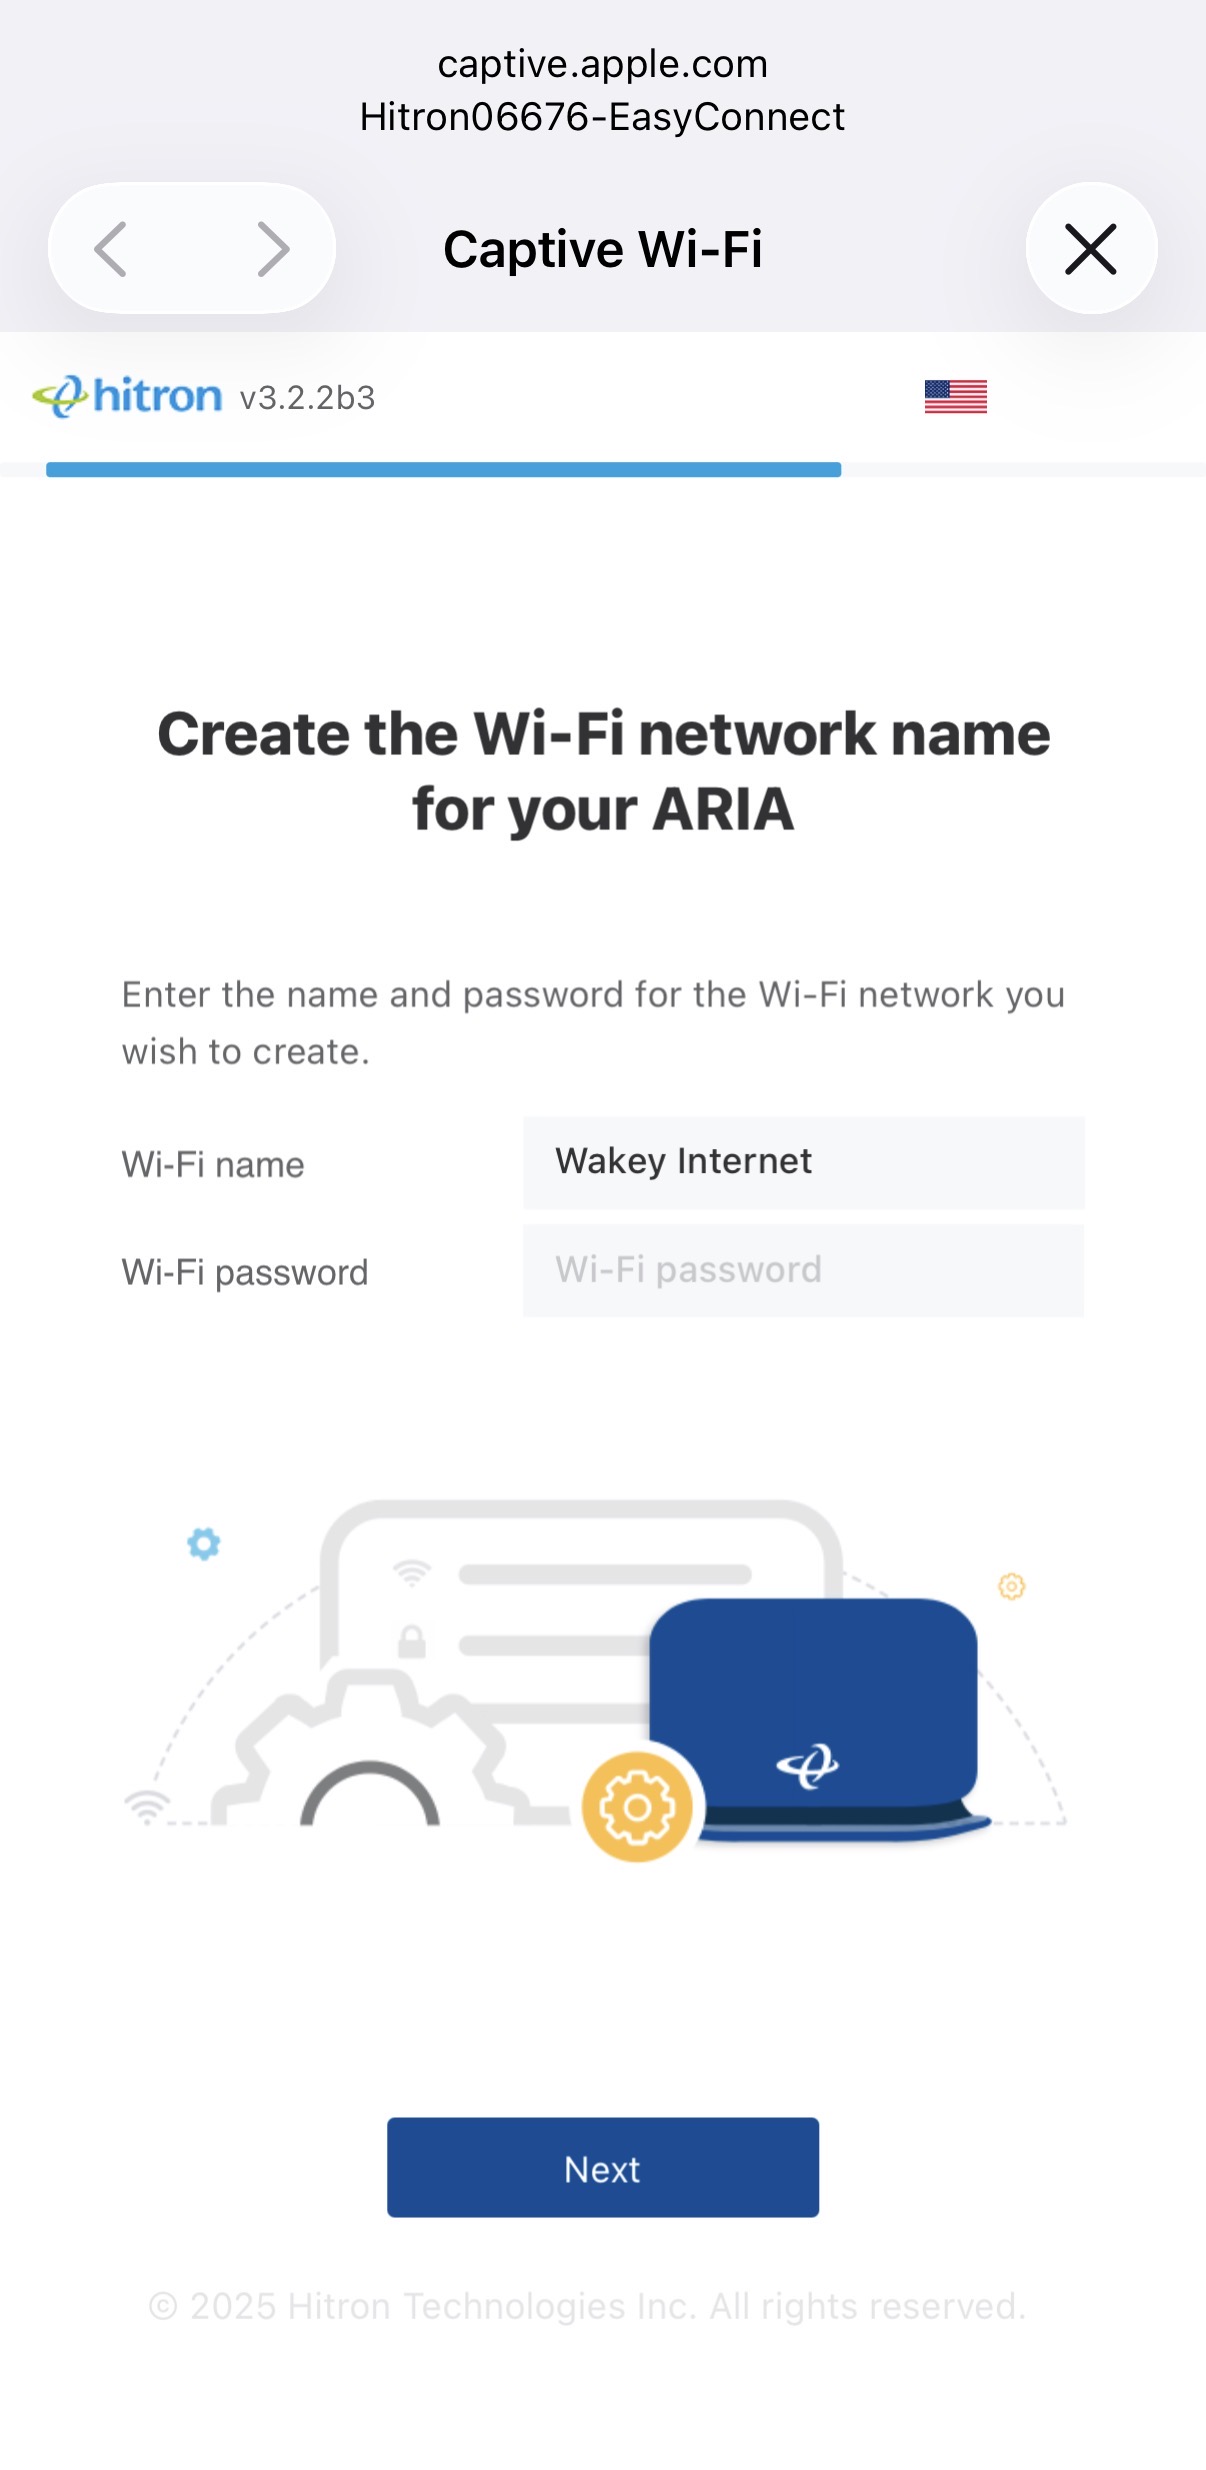
Create the Wi-Fi name and password you’d like to use for your new Wakey Internet connection.
Wi-Fi Name:
This is the network name your phones, computers, TVs and other devices will see.
Wi-Fi Password:
This is the password your devices will use to connect to Wi-Fi.
Once you’re happy with your Wi-Fi name and password, select Next.
Replacing an Existing Router?
If you use the exact same Wi-Fi name and password as your previous router, some existing devices may reconnect automatically. Otherwise, you’ll need to reconnect your devices using your new credentials.
Step 10 — Name Your ARIA 2210
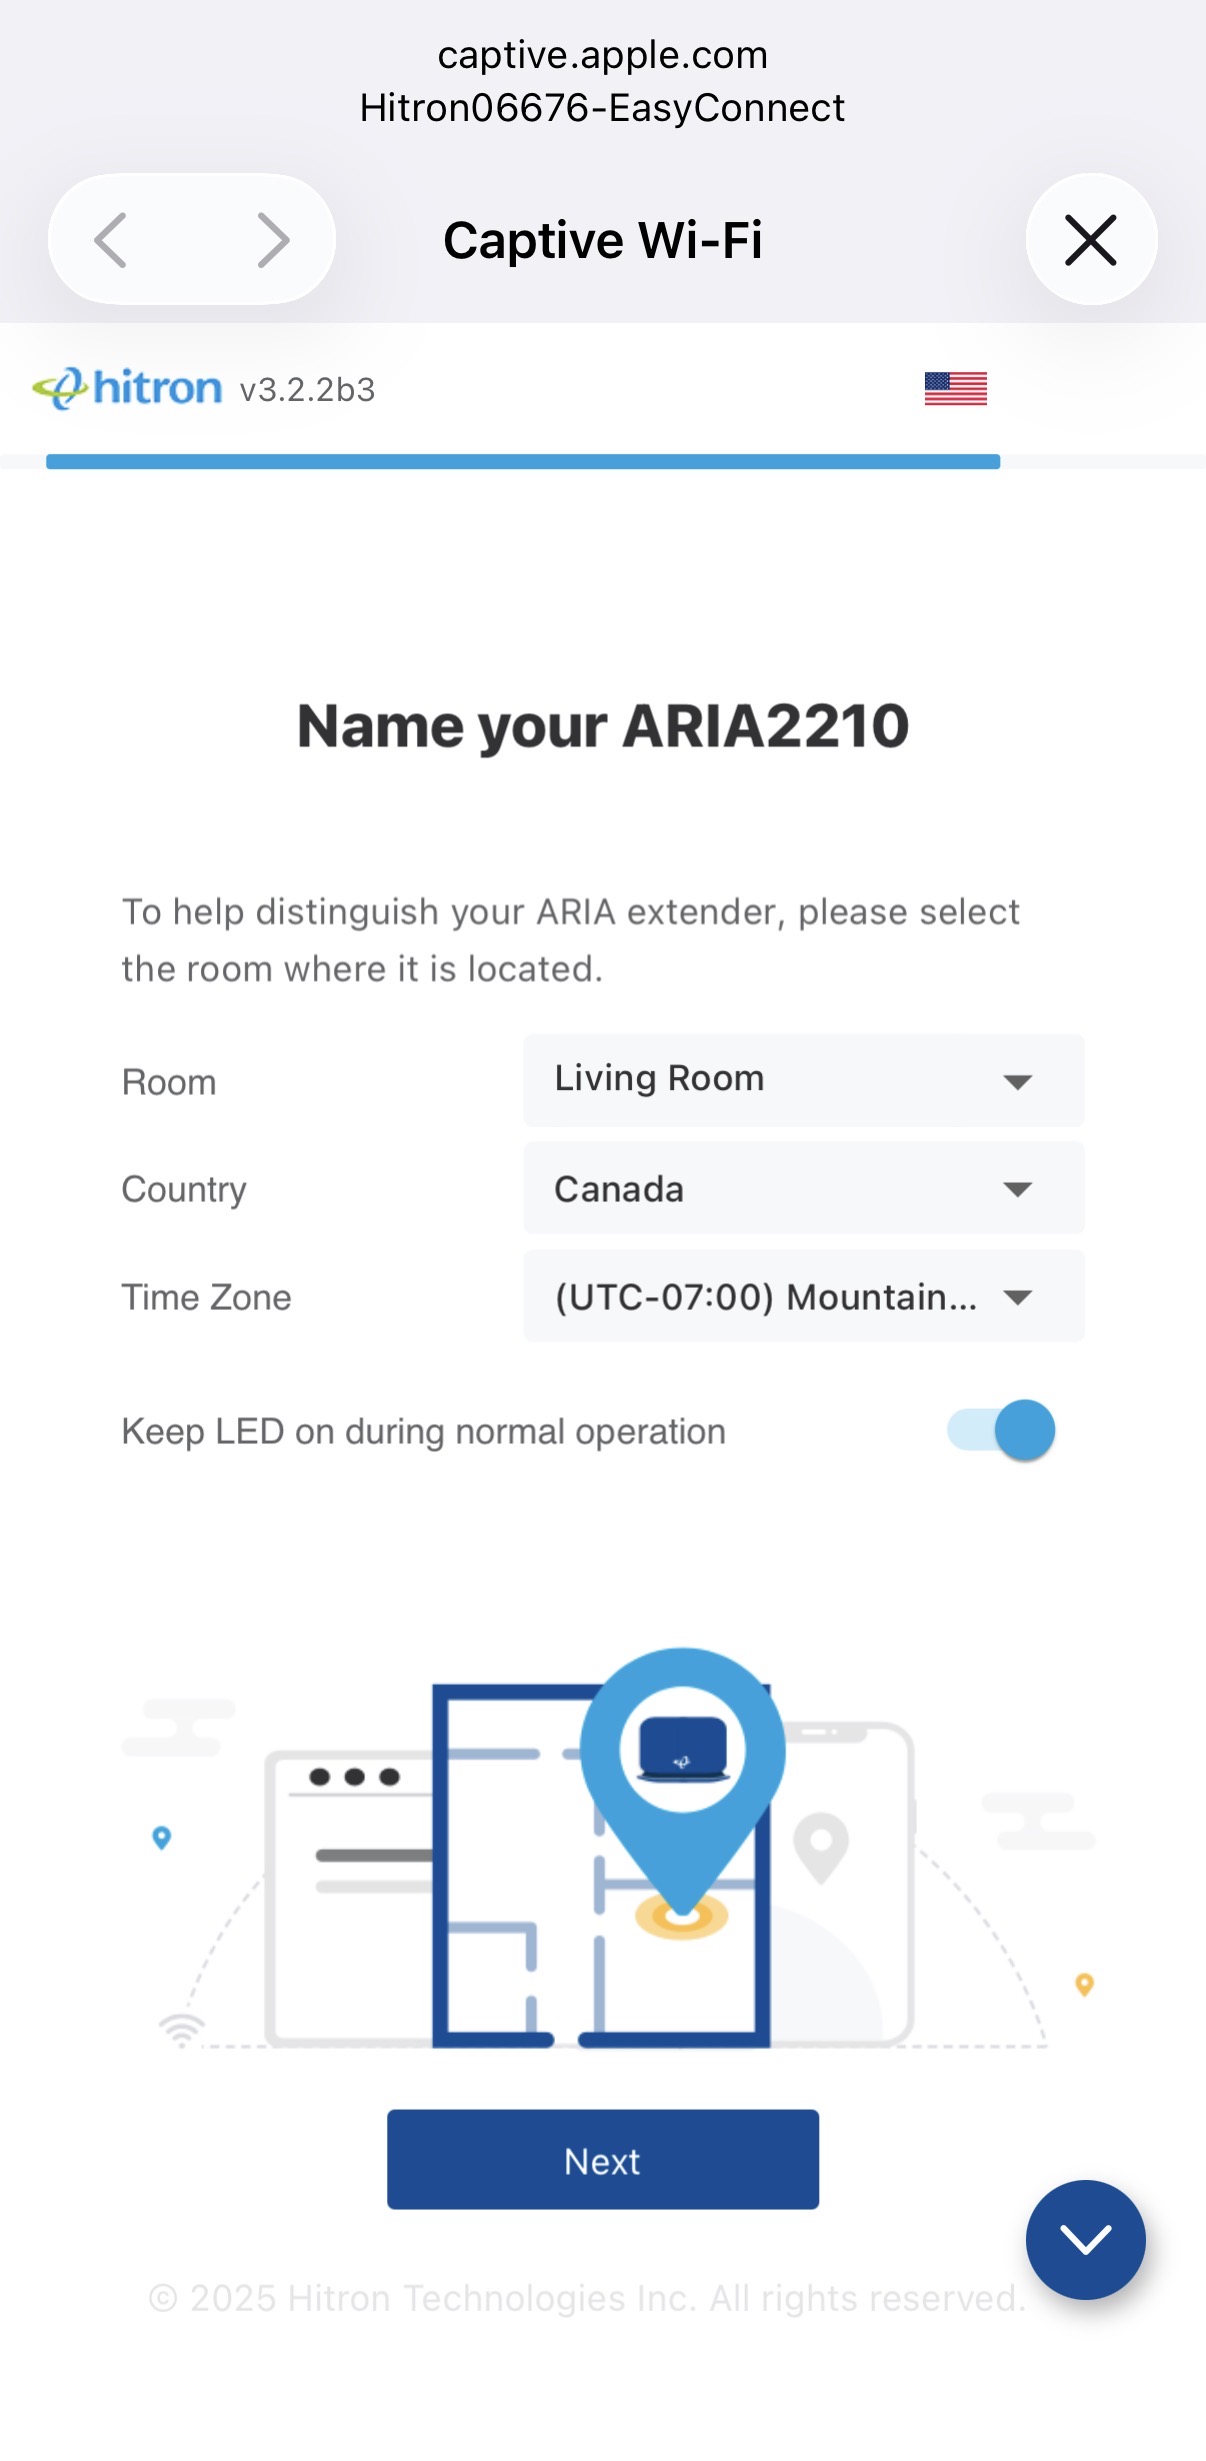
Tell the ARIA Where It Lives
Choose:
- The room where your ARIA is located
- Canada as the country
- Your applicable time zone
We also recommend leaving “Keep LED on during normal operation” enabled.
Keeping the LED enabled makes it much easier to identify the router’s status if troubleshooting is ever needed. Select Next when finished.
Step 11 — Setup Complete!
Your ARIA 2210 Is Good to Go
You’ve successfully configured your main ARIA 2210 in Router Mode.
The final setup page should display your new Wi-Fi network name and password for confirmation.
Modem → ARIA → Wi-Fi → You’re Online!

One Last Step — Connect to Your New Wi-Fi
Your phone, tablet or computer may not automatically move from the temporary EasyConnect network to the permanent Wi-Fi network you just created.
Open your device’s Wi-Fi settings and select the Wi-Fi name you created during Step 9.
Enter your new Wi-Fi password and connect.
Accessing Advanced ARIA Settings Later
ARIA 2210 Administration
Once connected to your new Wi-Fi network, advanced router settings can be accessed by visiting:
192.168.0.1
Username: cusadmin
Password: The administrator password you created during setup.
We recommend changing advanced settings only if you’re comfortable configuring networking equipment or have been instructed to do so by the Wakey Crew.
Adding Additional ARIA 2210 Mesh Units
If you have additional ARIA 2210 units, configure your main router first using the steps above.
Configure Additional ARIAs as Extenders
- Connect the additional ARIA 2210 to power.
- Allow it to completely boot.
- Make sure the LED is slowly flashing/pulsing white.
- If it isn’t flashing white, factory reset it using the 15-second RESET procedure described earlier in this guide.
- Connect to its temporary EasyConnect Wi-Fi network.
- Begin the setup process as you did with the main ARIA.
- When asked whether to configure it as a router or extender, select Configure as Extender.
- Continue through the setup wizard.
Only your main ARIA connected to the modem should be configured as the Router. Additional mesh ARIA units should be configured as Extenders.
Mesh Placement Matters
Place additional ARIA units between your main router and the area needing better Wi-Fi coverage.
Avoid placing an extender directly inside a Wi-Fi dead zone. The extender still needs a good connection back to the main ARIA in order to provide a good connection to your devices.
Having Issues or Need More Help?
The Wakey Crew Is Here to Help
If your ARIA 2210 isn’t connecting after following the steps above, reach out to us through Live Chat.
Before contacting us, it’s helpful to check:
- What the ARIA’s LED is doing
- Whether the Wakey modem is fully online
- Whether the ARIA is the only device connected to the modem
- Whether the Ethernet cable is connected from Modem LAN 1 → ARIA LAN 2
- Whether the issue affects all devices or only one
That information helps us move on to the next troubleshooting step faster.