


Congratulations — Welcome to Wakey!
Let’s Get You Connected
Getting connected usually takes about 10–15 minutes, and you definitely don’t need to be a tech wiz! Your Wakey Starter Kit includes the equipment you need to get started.
Here’s the game plan:
1. Find your coaxial connection
2. Identify your modem
3. Get your modem online
4. Set up your Wi-Fi
5. Get connected! ✓
Locate a Coaxial Outlet
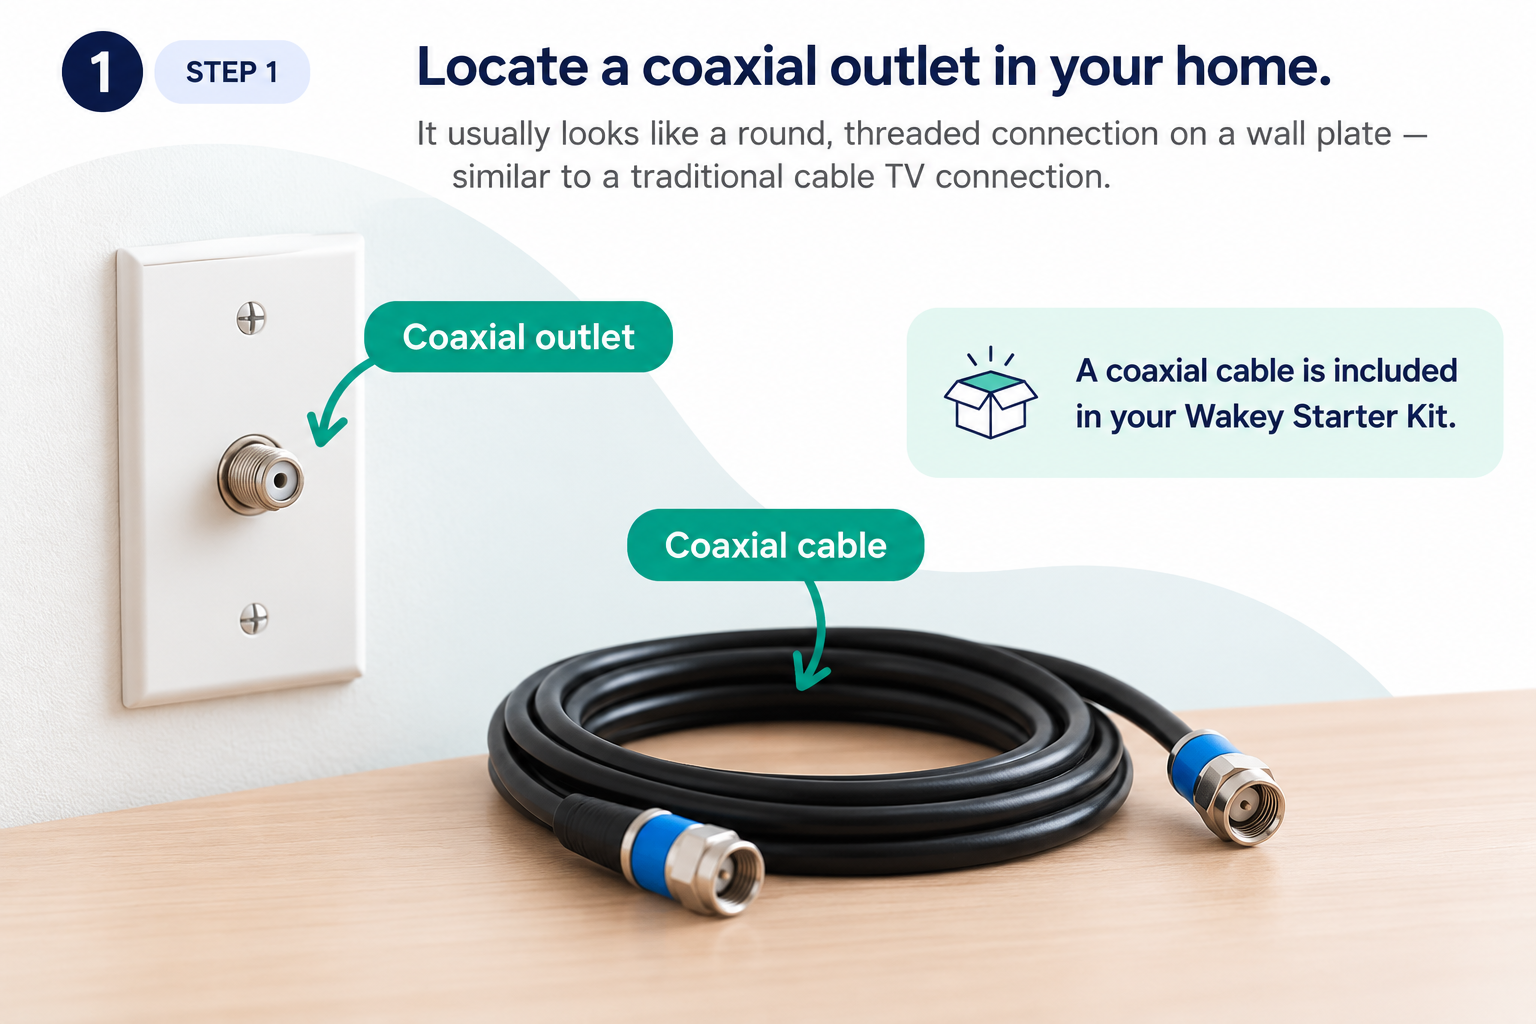
First, locate a coaxial (coax) outlet or cable in your home or business. It usually looks like a round, threaded connection on a wall plate — similar to a traditional cable TV connection.
Your Wakey Starter Kit includes a coaxial cable, which you’ll use to connect the wall outlet to your modem.
Can’t Find One?
Take a look around! The active coaxial outlet may not be in the most obvious location.
Common places to check:
- Living room or family room
- Basement
- Home office
- Utility or mechanical closet
- Bedroom
- Near an electrical panel or telecommunications equipment
You may have more than one coaxial outlet. That’s completely normal — but not every outlet is necessarily connected to the active cable network.
Which Outlet Is Active?
That’s what we’re going to find out!
Connect your modem to a coaxial outlet, connect the modem to power, and give it approximately 3–5 minutes to begin establishing a connection.
We’re looking for the outlet that allows the modem’s main connection lights to become solid.
If the modem doesn’t establish a connection, don’t worry. Try another coaxial outlet or coaxial cable in your home. The active connection may be somewhere else.
Will I Need a Technician?
Maybe — but often, you won’t!
Our last-mile network vendor determines whether your address can be activated remotely using an existing coaxial connection or whether a technician visit is required.
If a technician dispatch is required to establish your service, Wakey will cover the $79 + tax dispatch fee on us.
Found your coaxial connection? Perfect — let’s identify your modem. →
Which Modem Did You Receive?

Take a look at the modem included in your Wakey Starter Kit and match it with one of the options below.
Not sure? Look for a label on the bottom or back of your modem. You should see a Model or Model Number.
Hardware Loan & Bring Your Own Equipment
Hardware provided by Wakey is available on a $0 per month loan and is fully tested before being provided, regardless of cosmetic appearance.
Under Wakey’s hardware loan program, equipment cannot be exchanged for an alternative make or model.
Prefer to use your own equipment? No problem! You’re welcome to provide your own modem, subject to approval and compatibility requirements from our network vendors, and/or provide your own wireless router where necessary.
View Wakey’s Approved DOCSIS 3.1 Modem List →
Need help choosing or confirming equipment? Open a Ticket with Wakey →
Technicolor TC4400
Cable Modem — No Built-in Wi-Fi
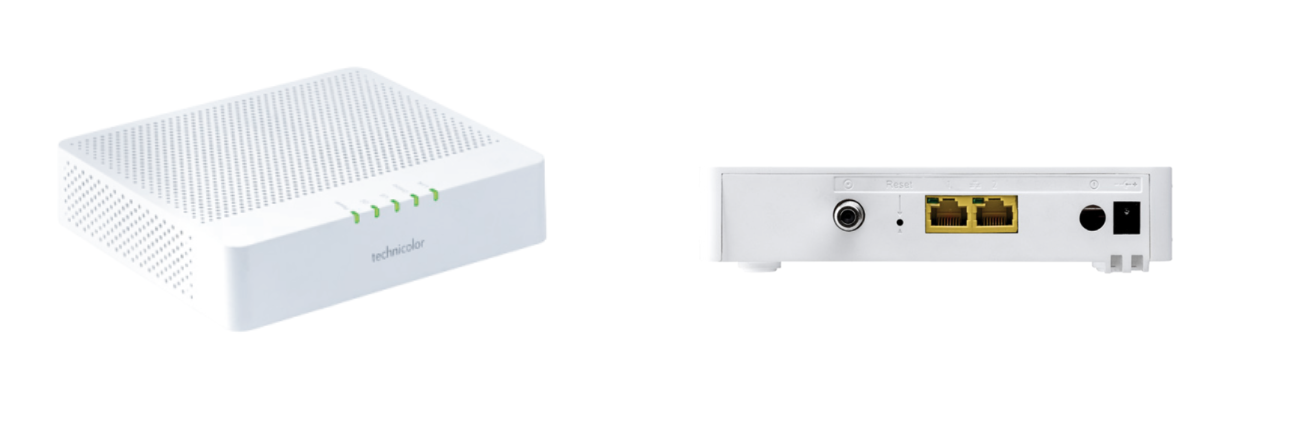
The TC4400 is a standalone cable modem. It does not have built-in Wi-Fi, so we’ll connect your Wakey Wi-Fi equipment or your own router after we get the modem online.
Model: Technicolor TC4400
CBN CD8000
Cable Modem — No Built-in Wi-Fi
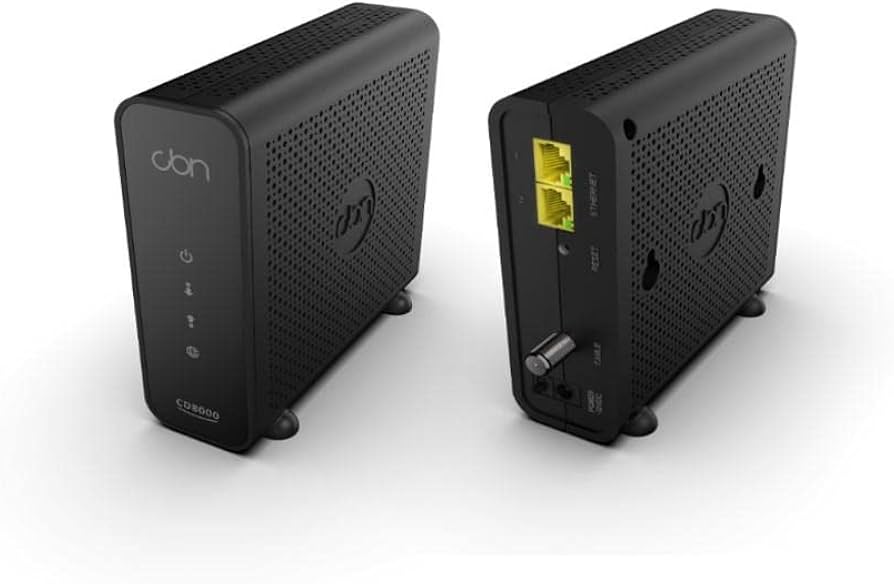
The CD8000 is a standalone cable modem. It does not have built-in Wi-Fi, so we’ll connect your Wakey Wi-Fi equipment or your own router after we get the modem online.
Model: CBN CD8000
Sercomm DM1000
Cable Modem — No Built-in Wi-Fi
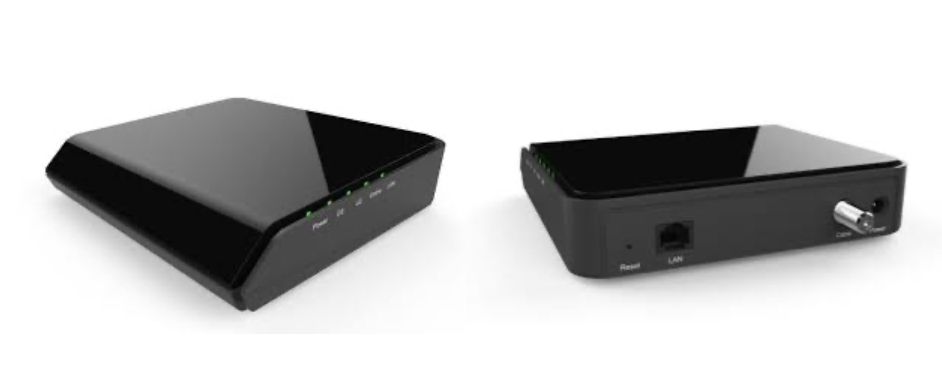
The DM1000 is a standalone cable modem. It does not have built-in Wi-Fi.
Model: Sercomm DM1000
Hitron CODA-56
Cable Modem — Available in Black or White — No Built-in Wi-Fi
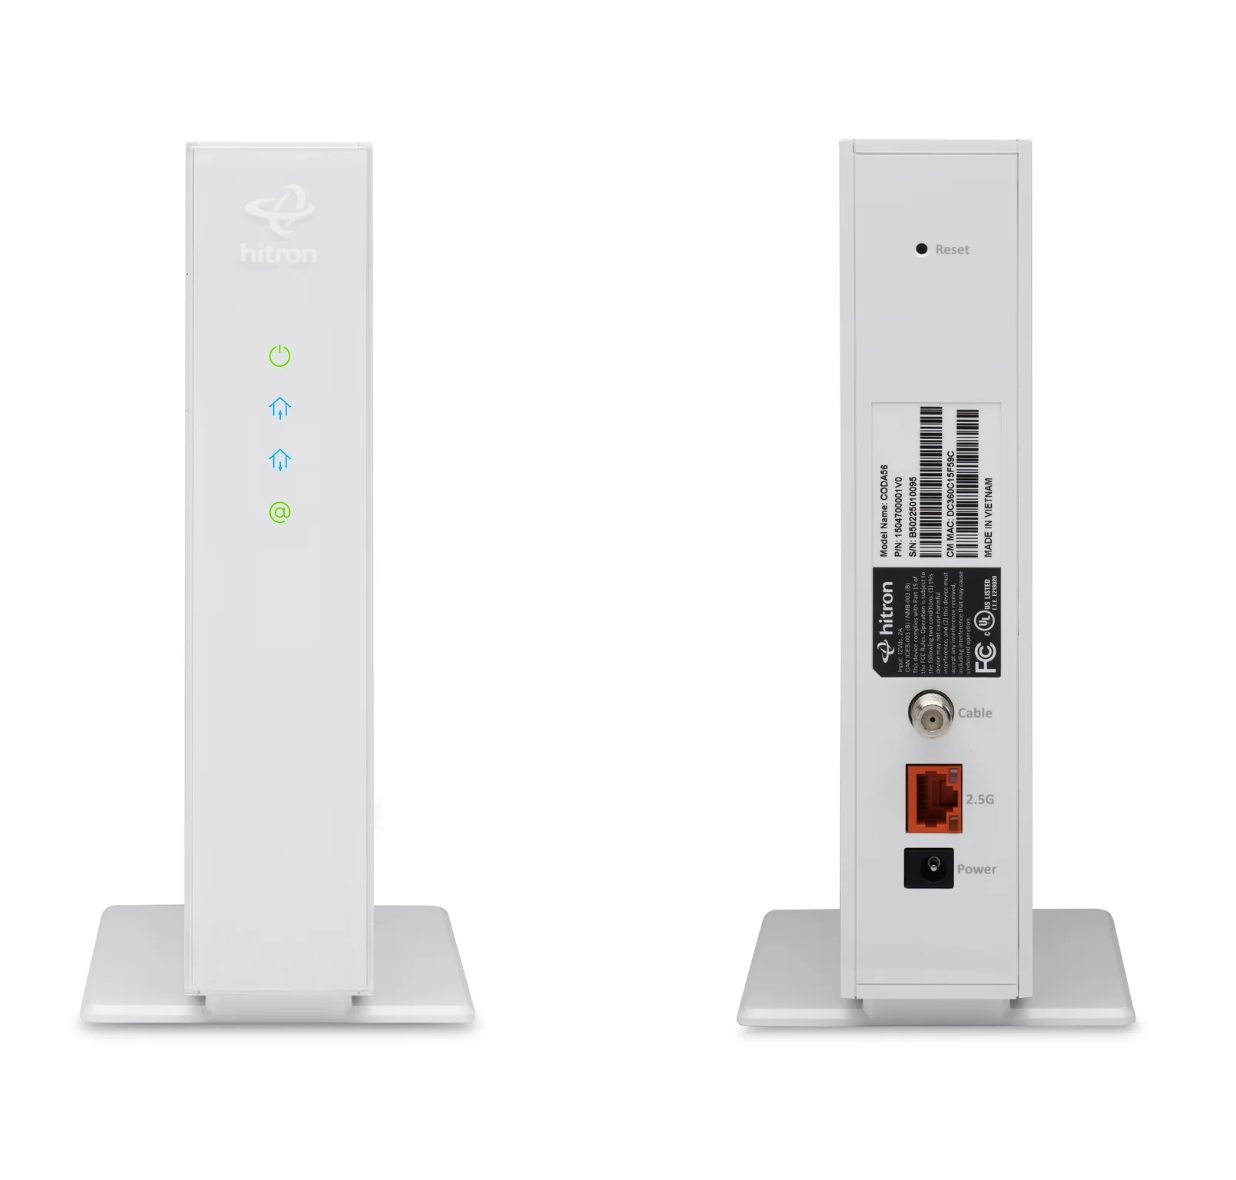
The Hitron CODA-56 is a standalone cable modem. It does not have built-in Wi-Fi.
Model: Hitron CODA-56
Advanced CODA-56 information →
Technicolor CGA4234
Cable Modem + Built-in Wi-Fi
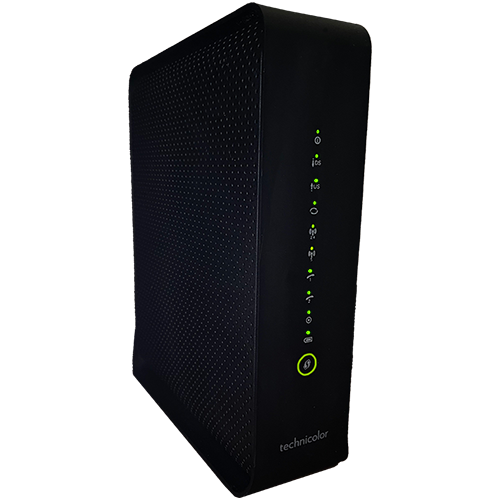
Good news — this one’s an all-in-one! The CGA4234 has built-in Wi-Fi, so a separate Wi-Fi router generally isn’t required.
Model: Technicolor CGA4234
Wi-Fi: Built in
Advanced CGA4234 information →
Still Not Sure Which Modem You Have?
Look for the manufacturer’s label on the bottom or back of your modem.
Find Model or Model Number and look for:
TC4400 • CD8000 • DM1000 • CODA-56 • CGA4234
Found it? Great — let’s get it online.
Did You Provide Your Own Approved Modem?
No problem! If you’re using your own approved DOCSIS 3.1 modem, your hardware may look different from the Wakey-supplied equipment above.
Because third-party modem models vary, our team may not be fully trained on the menus, lights or configuration specific to your hardware.
The good news? The basic idea is the same. Connect the coaxial cable and power. We’re looking for the modem’s main connection indicators to establish a connection.
Get Your Modem Online
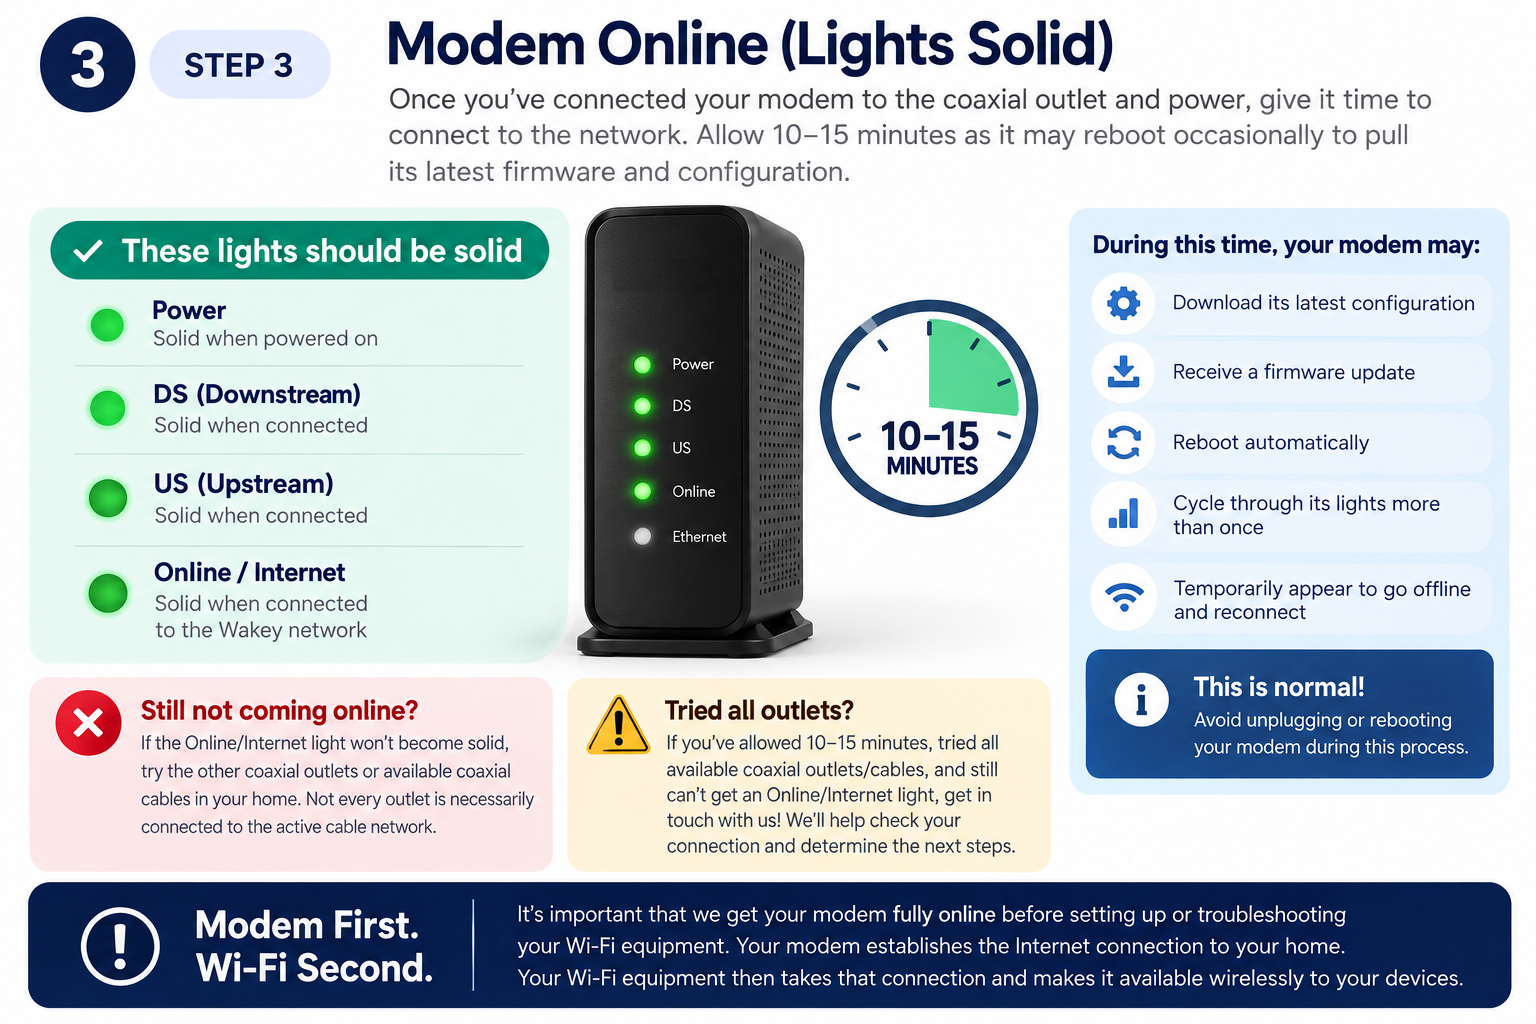
Connect Your Modem
1 — Connect the Coaxial Cable
Connect the coaxial cable from the wall outlet to your modem. Make sure it’s snug.
2 — Connect the Power
Plug your modem into power and let it begin starting up.
3 — Watch the Lights
We’re looking for the modem’s main connection indicators to become solid.
These will typically include:
- Power
- DS / Downstream
- US / Upstream
- Online / Internet
Depending on your modem, Internet may be labelled Online, Internet, or represented by a globe symbol. Ethernet or activity lights may blink normally.
Please Give It 10–15 Minutes
Even if the modem appears to come online quickly, leave it connected for approximately 10–15 minutes.
During its first connection, your modem may:
- Download its latest configuration
- Receive a firmware update
- Reboot automatically
- Cycle through its lights more than once
- Temporarily appear to go offline and reconnect
That’s normal! Avoid unplugging or rebooting the modem while it’s doing its thing.
✓ Online / Internet Light Solid?
Perfect — your modem is online!
Your modem has successfully established an Internet connection to the Wakey network.
You’re ready for Step 4 — setting up your Wi-Fi. →
Not Coming Online?
Don’t panic — there are a few easy things to try first.
⚠ Try These First
✓ Give the modem the full 10–15 minutes.
✓ Make sure the coaxial cable is securely connected at the wall and modem.
✓ Make sure the modem has power.
✓ Try the other coaxial outlets around your home or business.
✓ If available, try another coaxial cable.
Remember: having a coaxial outlet doesn’t necessarily mean that particular outlet is connected to the active cable network.
DO NOT PROCEED TO WI-FI
Can’t get the modem’s Online / Internet light solid?
If you’ve allowed the modem time to start, checked the cables, tried the available coaxial outlets and exhausted the steps above, stop here.
Setting up or troubleshooting Wi-Fi will not fix a modem that isn’t connected to the Internet.
We’re Here to Help
Option 1 — Live Chat
Visit our website and open Live Chat in the bottom-right corner. Our team can check your connection and help determine what’s happening.
Option 2 — Open a Ticket
Open a support ticket with our team. We respond fast during business hours and can continue troubleshooting with you.
If we determine that a technician dispatch is required to establish your connection, Wakey will cover the $79 + tax dispatch fee on us.
We’ll get the modem online first — then we’ll tackle Wi-Fi together.
Why Modem First?
Your modem brings the Internet connection into your home.
Your Wi-Fi equipment takes that connection and shares it wirelessly with your phones, computers, TVs and other devices.
No Internet at the modem = no Internet over Wi-Fi.
Let’s Set Up Your Wi-Fi
Modem Online? Let’s Get Your Wi-Fi Connected!
Great! Now that your modem is online, it’s time to get Wi-Fi working throughout your home.
Find the Wi-Fi equipment that looks like yours below and follow the simple steps.
Hitron ARIA2210
Wi-Fi Router / Extender — Available in Black or White
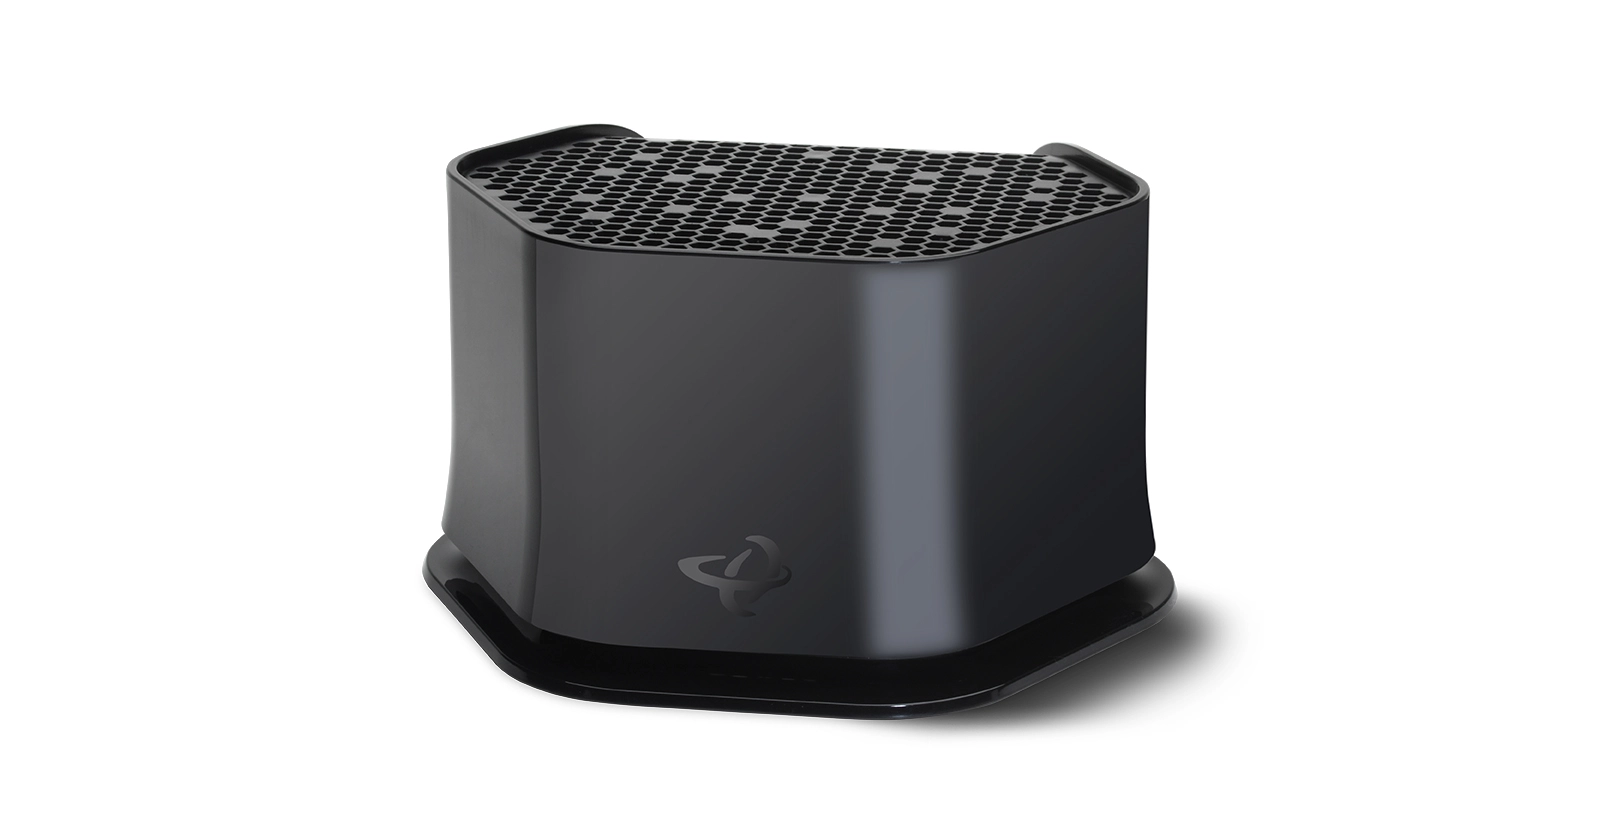
If your Wi-Fi equipment looks like this, you have a Hitron ARIA2210.
QUICK SETUP — Hitron ARIA2210
Let’s get your Wi-Fi running. It only takes a few steps!
1 — Connect the ARIA to Your Modem
Using an Ethernet cable, connect:
Modem LAN 1 → ARIA LAN 2
2 — Grab Your Phone, Tablet or Computer
Open your device’s Wi-Fi settings and look for a network beginning with:
Hitron-EasyConnect-xxxx
The last few characters will be different for every ARIA. Select it and connect.
3 — Choose “Configure as Router”
The EasyConnect setup should appear on your device.
When asked how you’d like to configure your ARIA, choose:
Configure as Router
4 — Create Your Wi-Fi
Follow the prompts to create your own:
- Wi-Fi name
- Wi-Fi password
Save your settings and give the ARIA a moment to apply them.
✓ That’s it! Connect your devices using the Wi-Fi name and password you just created.
Need more help? View the complete ARIA2210 setup guide →
TP-Link Deco M5
Mesh Wi-Fi Router
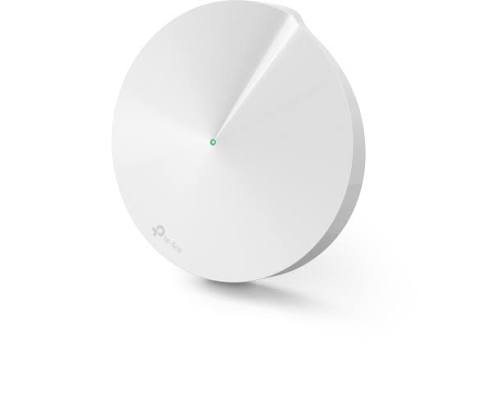
If your Wi-Fi equipment looks like this, you have a TP-Link Deco M5.
QUICK SETUP — TP-Link Deco M5
Your phone or tablet will walk you through most of the setup.
1 — Download the Deco App
On your phone or tablet, download the TP-Link Deco App.

2 — Open the App
Create a TP-Link account, or sign in if you already have one.
3 — Connect Your Deco
Connect your primary Deco M5 to your modem using an Ethernet cable, then connect the Deco to power.
4 — Follow the App
The Deco App will guide you through the rest of the setup, including creating your:
- Wi-Fi name
- Wi-Fi password
✓ That’s it! Once the app says your Deco is ready, connect your devices to your new Wi-Fi.
Need more help? View the complete Deco M5 setup guide →
Technicolor CGA4234
Modem + Built-in Wi-Fi
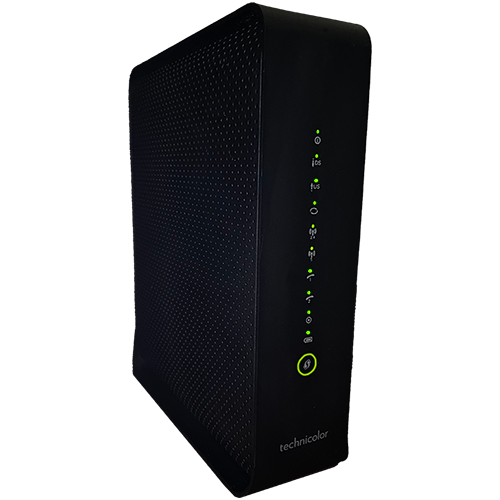
If you received the Technicolor CGA4234, your setup is a little different — and even easier!
Your modem already has Wi-Fi built in, so you don’t need to connect a separate Wi-Fi router.
QUICK SETUP — Built-in Wi-Fi
Everything you need to get started is printed right on your modem.
1 — Look Underneath Your Modem
On the bottom of your CGA4234, find the label showing its default:
- Wi-Fi name
- Wi-Fi password / passphrase
2 — Connect Your Phone, Tablet or Computer
Open your device’s Wi-Fi settings.
Find the Wi-Fi name printed on the modem and connect using the printed password.
3 — Complete Setup (Get Online)
While connected to your modem’s Wi-Fi, open a web browser such as Chrome, Safari, Edge or Firefox.
At the top of the browser — where you would normally enter a website such as www.wakeyinternet.ca — enter:
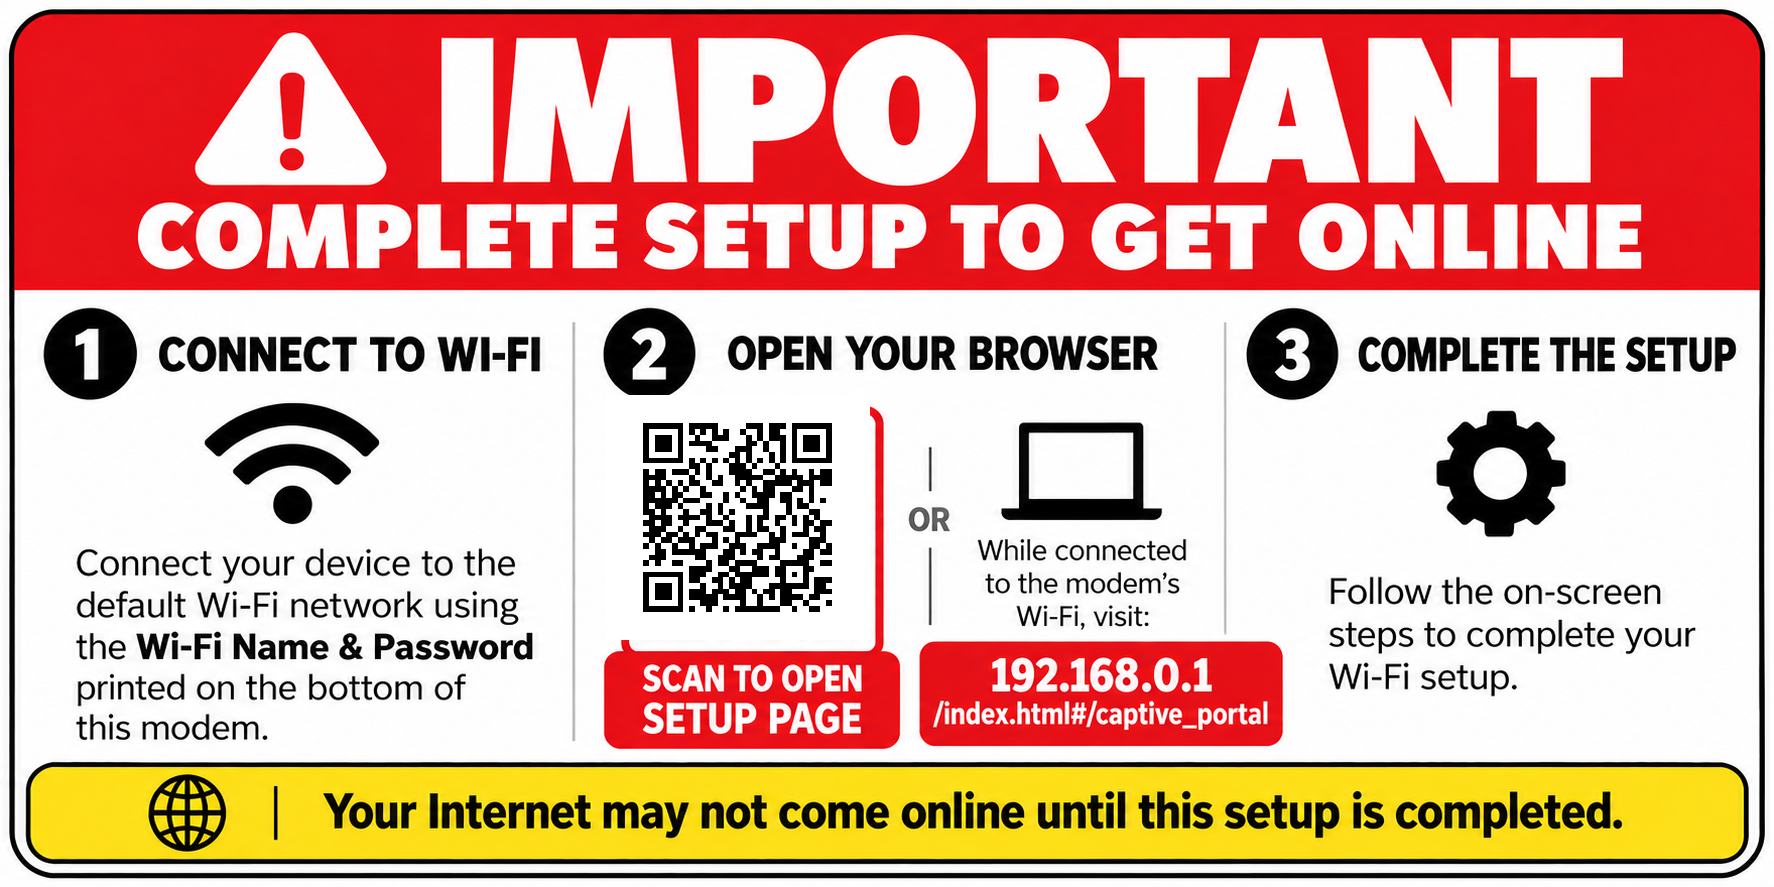
Then press Enter or Go.
4 — Choose Your Wi-Fi Settings
Keep the default Wi-Fi information or create your own:
- Wi-Fi name
- Wi-Fi password
One little heads-up: If you change the Wi-Fi name or password, your device may disconnect. That’s normal! Simply reconnect using the new Wi-Fi information you created.
✓ You’re done!
Need more help? View the complete CGA4234 setup guide →
Using Your Own Wi-Fi Router?
No problem! Routers from different manufacturers all look and work a little differently.
QUICK SETUP — Your Own Router
1 — Connect Your Router
Use an Ethernet cable to connect your modem to the port on your router labelled something like:
Internet • WAN • Internet/WAN
2 — Turn It On
Connect your router to power and give it a few minutes to start.
3 — Follow Your Router’s Instructions
Follow the app or setup instructions provided by your router manufacturer to create your Wi-Fi network.
Wakey can help make sure the Internet connection reaching your modem is working. Because customer-provided routers vary, you may need to follow your manufacturer’s instructions for router-specific Wi-Fi settings.
Have More Than One Wi-Fi Unit?
Extra Deco M5 or Hitron ARIA? Even Better!
Additional Wi-Fi units can help boost your existing wireless network and provide better coverage in other areas of your home.
Adding Another Hitron ARIA2210
Repeat the ARIA setup steps above by connecting to the additional unit’s Hitron-EasyConnect-xxxx network.
This time, instead of choosing Configure as Router, choose:
Configure as Extender
Follow the prompts to connect it to your existing Wi-Fi network.
Primary ARIA = Router
Additional ARIA units = Extenders
Adding Another TP-Link Deco M5
Open the TP-Link Deco App and choose the option to add another Deco to your existing network.
The app will walk you through the rest.
First Deco = Main Deco
Additional Decos = Extend your existing mesh Wi-Fi network
Where Should I Put the Extra Unit?
Place it somewhere between your main Wi-Fi unit and the area where you want better coverage. Don’t place it all the way inside a Wi-Fi dead zone — the additional unit still needs a good connection to your existing network in order to extend it farther.
✓ Wi-Fi Working? You’re All Set!
Connect your phones, computers, TVs and other devices using your Wi-Fi name and password.
Modem Online → Wi-Fi Connected → Devices Connected