


Technicolor CGA4234 Wi-Fi Modem Guide
The Technicolor CGA4234 is a DOCSIS 3.1 cable modem with built-in dual-band Wi-Fi, designed to provide fast, reliable Internet throughout your home.
Whether you’re connecting for the first time, changing your Wi-Fi password, using your own router or troubleshooting your modem, this guide will walk you through the essentials.
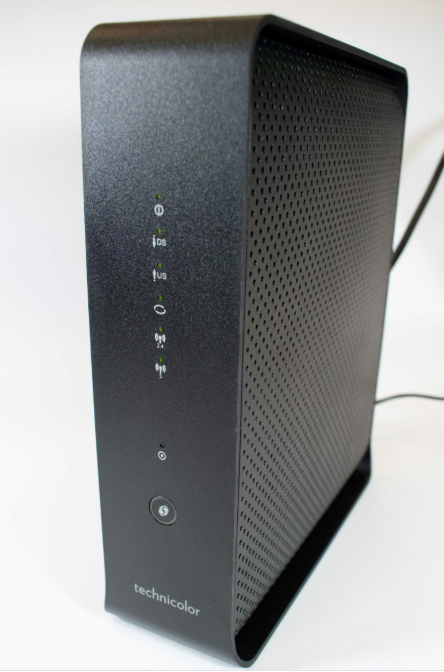
One Modem. Wi-Fi Built Right In.
Unlike a standalone cable modem, the CGA4234 has Wi-Fi built in. For most homes, that means you don’t need a separate Wi-Fi router to get connected.
Your CGA4234 provides both 2.4 GHz and 5 GHz Wi-Fi networks, allowing you to choose the best connection for different devices around your home.
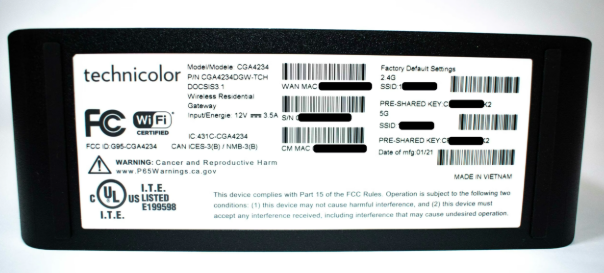
Your default Wi-Fi network names and password are printed on the modem’s label, so keep that information handy during setup.
2.4 GHz or 5 GHz — Which Should I Use?
2.4 GHz — Better Range
2.4 GHz is designed to travel farther and generally performs better through walls and over longer distances.
It can be a great choice for:
- Security cameras
- Video doorbells
- Smart-home devices
- Devices located farther away from your CGA4234
If a camera, doorbell or smart-home device is having trouble connecting, try the 2.4 GHz network.
5 GHz — Better Performance
5 GHz generally provides higher wireless speeds but has a shorter effective range than 2.4 GHz.
It’s ideal for higher-bandwidth devices such as:
- Streaming devices
- Smart TVs
- Gaming consoles
- Computers
- Phones and tablets
Getting Connected
Your CGA4234 is designed to be easy to set up right out of the box. There is, however, one important first-time setup step that must be completed before your Internet connection is fully ready to use.
Important — First-Time Setup Required
Setting up your CGA4234 for the first time? Before your Internet connection will function normally, you may need to complete the modem’s initial Wi-Fi setup.
First, connect your laptop, phone or tablet to the CGA4234 using either the default 2.4 GHz or 5 GHz Wi-Fi network printed on the modem’s label.
Look for the SSID (Wi-Fi Name) and Pre-Shared Key (Wi-Fi Password) printed on the bottom of the unit.
Once connected to the default Wi-Fi network, open a web browser and visit the following first-time setup address:
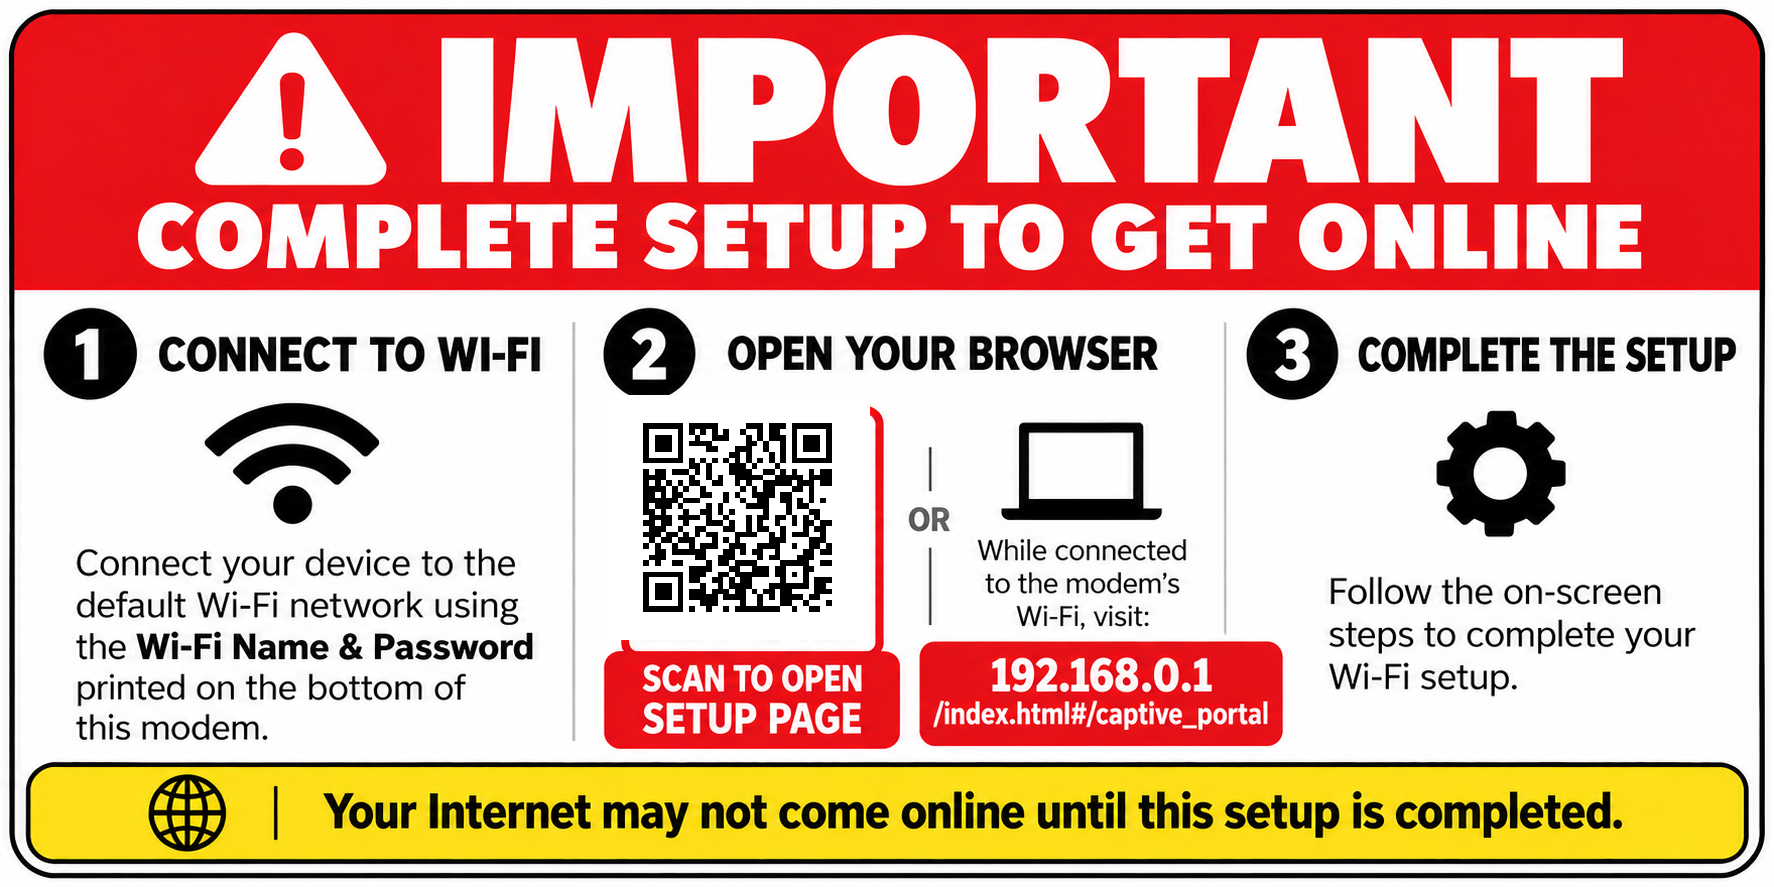
Important: For first-time setup, use the complete http://192.168.0.1/index.html#/captive_portal address. Simply entering the modem’s normal management IP may not open the setup page on all phones, tablets or computers.
The CGA4234 will walk you through its first-time setup.
Our Recommendation: Keep the Default Wi-Fi Settings
When asked whether you would like to change the default Wi-Fi settings, we recommend selecting:
NO
This keeps the Wi-Fi name and password printed on the bottom of your CGA4234 valid, making it much easier to reconnect devices or troubleshoot your connection later.
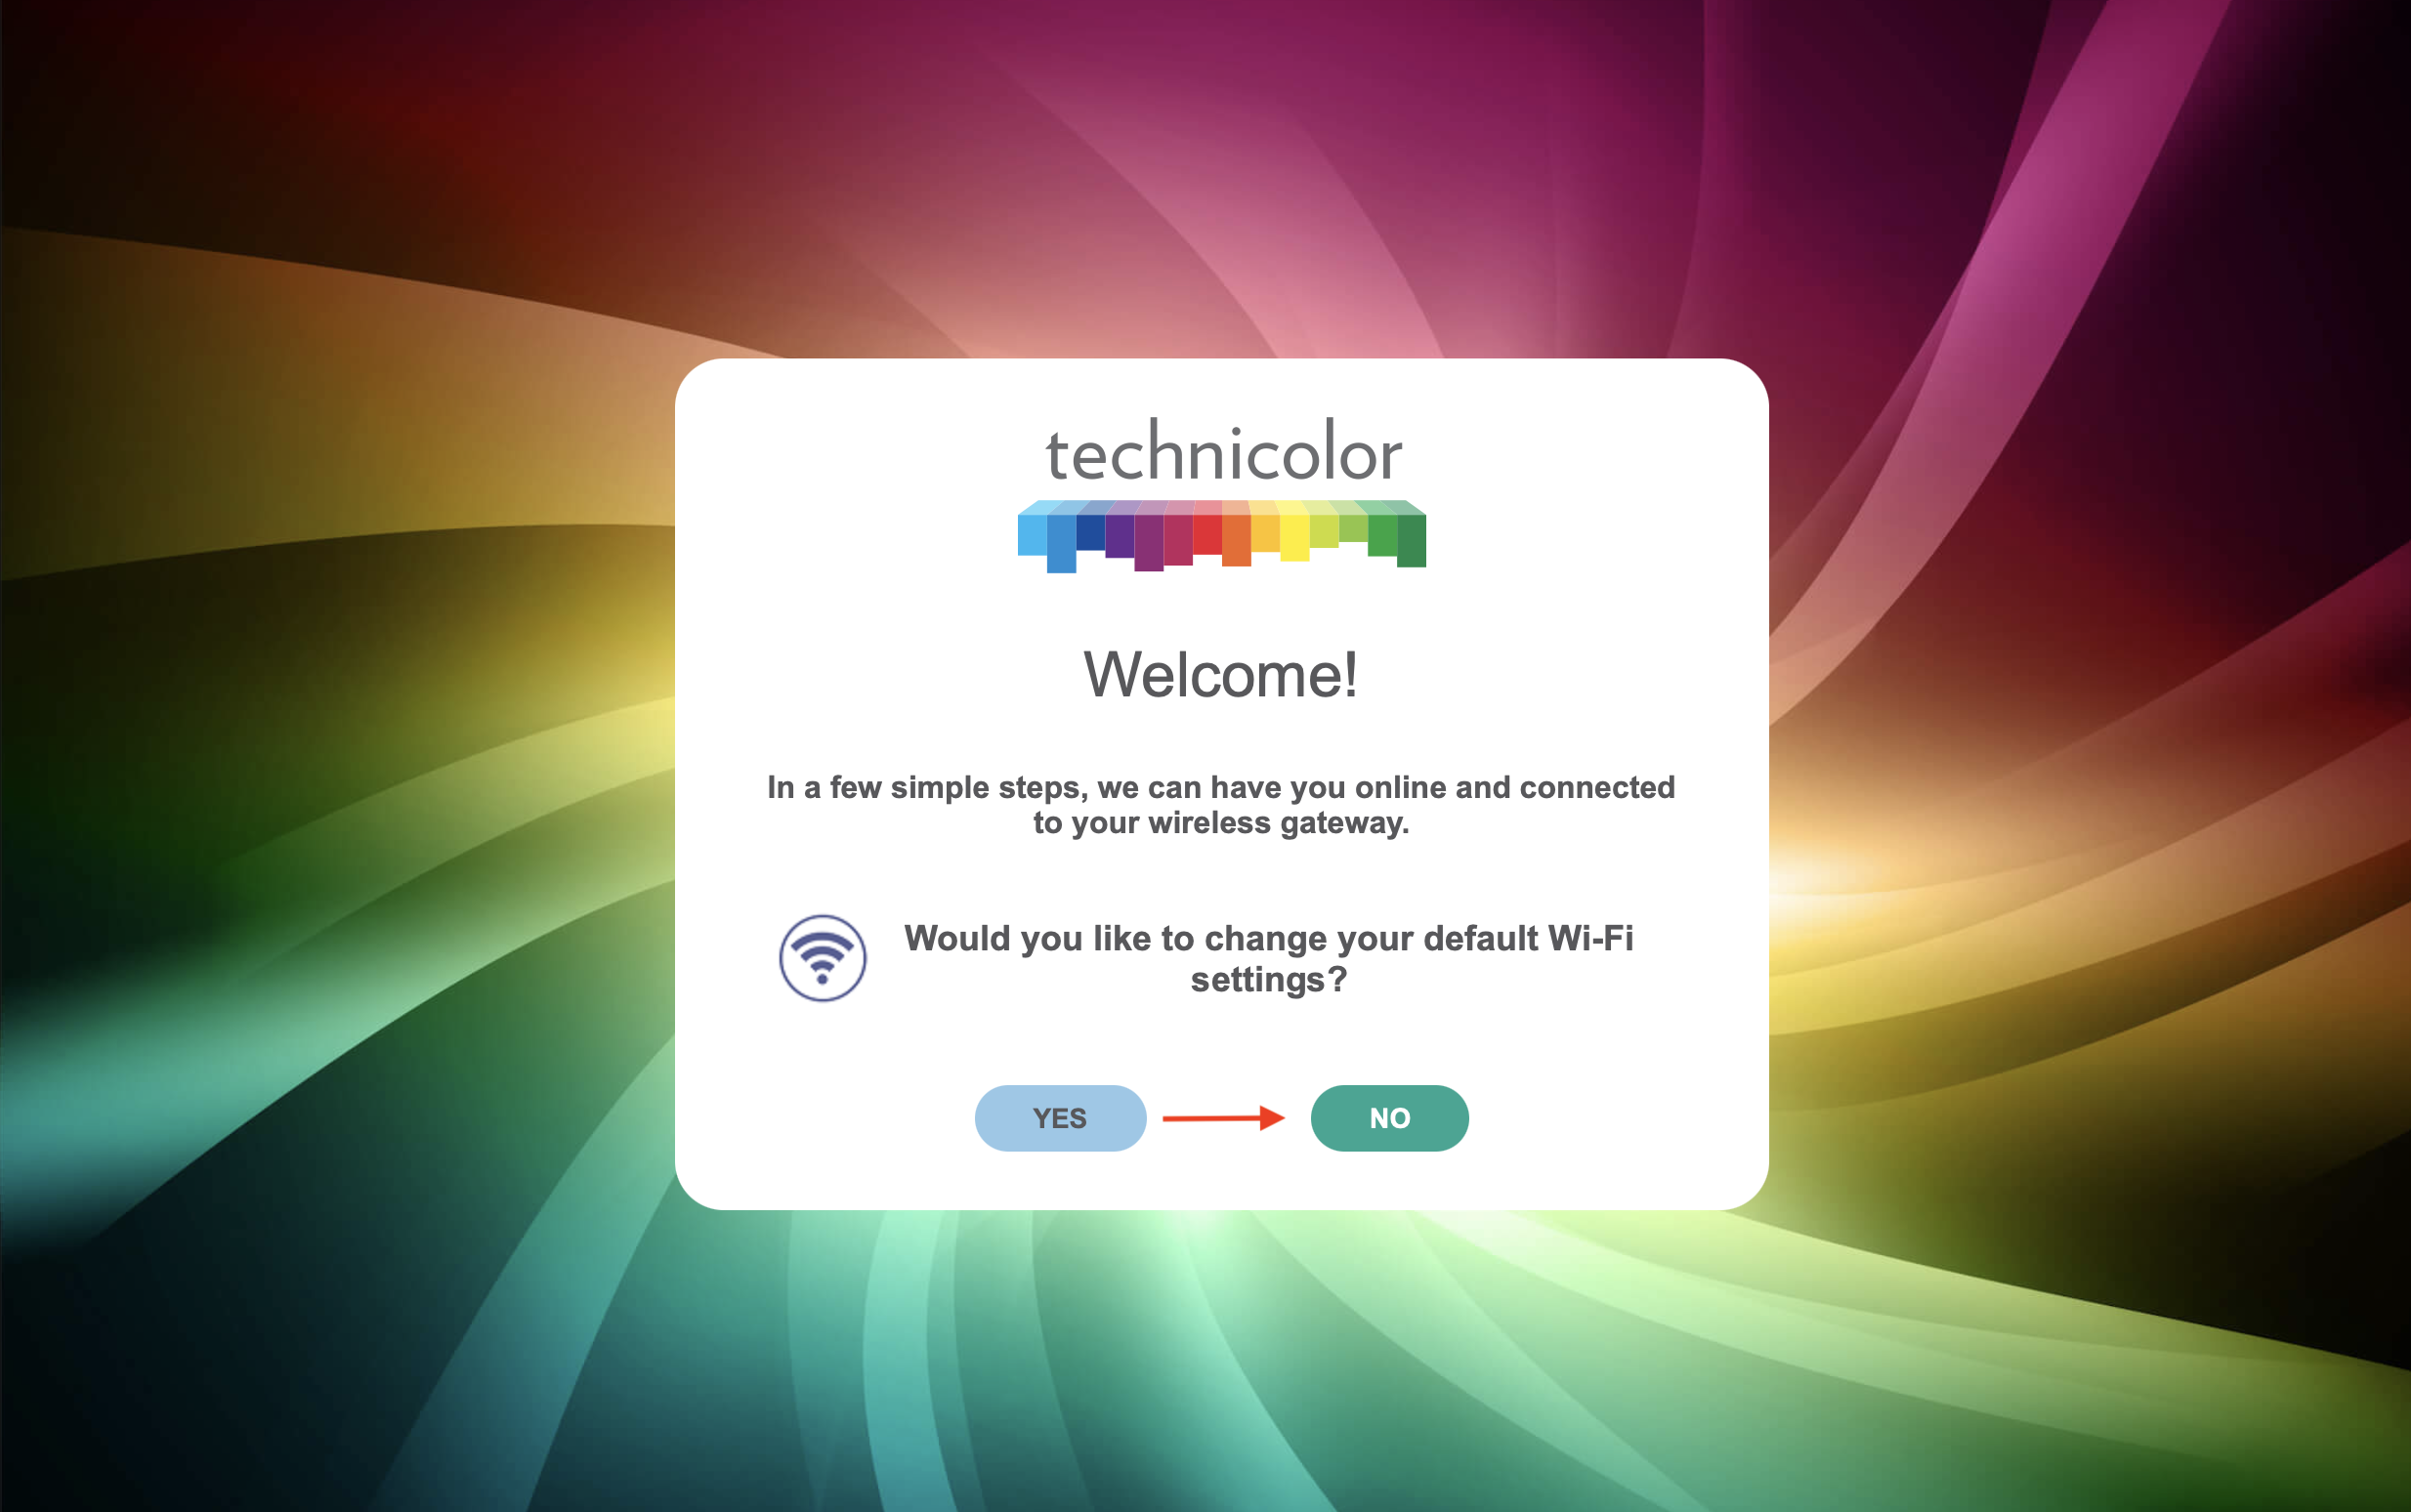
After completing the setup, allow approximately 2–3 minutes for the CGA4234 to apply its configuration.
Your Internet connection may not function until this first-time setup has been completed. If you’re connected to Wi-Fi but websites aren’t loading, visit 192.168.100.1 and make sure this step has been completed.
Quick Setup — Let’s Get Online
1 — Connect the Coaxial Cable
Connect the coaxial cable from your wall outlet to the coaxial connection on the modem. Make sure the connection is snug.
2 — Connect the Power
Connect the included power adapter and allow the modem to begin starting up.
3 — Give It Some Time
Wait approximately 5–10 minutes for the modem to establish its connection. During its first startup, the CGA4234 may also download configuration or firmware updates and may restart.
4 — Connect to the Default Wi-Fi
Using your laptop, phone or tablet, connect to either the default 2.4 GHz or 5 GHz Wi-Fi network using the Wi-Fi information printed on the CGA4234’s label.
5 — Complete First-Time Setup
Once connected to the CGA4234’s Wi-Fi, open a web browser and visit:
http://192.168.0.1/index.html#/captive_portal
Follow the on-screen setup. When asked whether you would like to change the default Wi-Fi settings, we recommend selecting NO.
Allow another 2–3 minutes for your settings to take effect.
Once this process is complete, your CGA4234 should be ready and your Wakey Internet connection can come fully online. For future modem management, use 192.168.100.1.
Which Address Should I Use?
Setting up the CGA4234 for the first time?
http://192.168.0.1/index.html#/captive_portal
Use the complete address above to open the CGA4234’s first-time setup / captive portal.
Already completed setup?
192.168.100.1
Use 192.168.100.1 to access the CGA4234 management interface after the initial setup has been completed.
Where Do I Find My Wi-Fi Information?
Your default Wi-Fi network name (SSID) and password (Pre-Shared Key) are unique to your modem.
Look for the Wi-Fi information printed on the label attached to the bottom of your CGA4234.
Helpful Tip: Take a picture of the label with your phone. If you ever need to reconnect after a reset, you’ll have the original Wi-Fi information handy without needing to move the modem.
Connected to Wi-Fi, but No Internet?
If your phone or computer shows that it’s connected to the CGA4234 but the Internet isn’t working, there are a few quick things to check.
First — Check Your Modem Lights
Check the DS, US and Internet/Online indicator on the front of your CGA4234.
If these indicators are solid, your modem has generally established a connection with the cable network.
If the DS light continues flashing, the coaxial outlet you’re connected to may not be active.
Try another coaxial outlet in your home if one is available. Common locations include:
- Living room
- Office
- Bedroom
- Basement
- Utility room
Seeing “No Internet Connection Detected”?
If you’ve just completed the setup process, your CGA4234 may still be applying its configuration.
Wait approximately 2–3 minutes and try browsing again.
If you’re still unable to access the Internet, try a simple power cycle:
- Unplug the CGA4234 from power.
- Wait approximately 15–30 seconds.
- Plug it back in.
- Allow several minutes for the modem to reconnect.
Once the modem lights have returned to normal, reconnect your device and try browsing again.
Default Modem Login
Want to change your Wi-Fi settings or manage your modem? You can access the CGA4234’s built-in management interface from a device connected directly to it by Wi-Fi or Ethernet.
Router Mode — Default
While connected to your modem, open a web browser and enter:
192.168.100.1
Default Username: Leave blank
Default Password: Leave blank
There’s no need to worry about the blank credentials — the local management interface is only available to devices connected to your CGA4234’s local network.
Bridge Mode
If your modem has already been placed into Bridge Mode, its management interface is available at:
192.168.100.1
Default Username: Leave blank
Default Password: Leave blank
Internet Works, but 192.168.100.1 Won’t Open?
Sometimes the CGA4234’s local management page may temporarily become inaccessible even though your Internet connection is working normally.
First, wait approximately 5–10 minutes and try again.
If it still won’t open:
- Make sure your device is connected directly to the CGA4234 by Wi-Fi or Ethernet.
- Power-cycle the CGA4234.
- Allow the modem to fully reconnect.
- Confirm your Internet connection is working.
- Visit 192.168.100.1 again.
The management page should normally become accessible again once the CGA4234 has fully restarted.
Changing Your Wi-Fi Name & Password
We recommend keeping the factory Wi-Fi information for simplicity, but you can customize your Wi-Fi name and password at any time.
Customize Your Wi-Fi
1 — Open the Modem Interface
Open a web browser and visit:
192.168.100.1
Leave both the Username and Password blank.
2 — Change Your Wi-Fi Name
Select Wireless, followed by Radio.
Enter your desired Wi-Fi name under:
- 2.4 GHz Wireless Network
- 5 GHz Wireless Network
Click Save.
3 — Change Your Wi-Fi Password
Select Security.
Enter your desired Wi-Fi password for both the 2.4 GHz and 5 GHz networks.
Click Save to apply your changes.
Changed Your Wi-Fi Information?
Your devices may disconnect after you click Save. That’s normal.
Simply reconnect your phones, computers, TVs and other devices using the new Wi-Fi name and password you created.
Slow Speeds? Let’s Rule Out Wi-Fi.
Wireless speeds can vary significantly, even when your Internet connection itself is performing normally.
For the Most Accurate Speed Test — Go Wired
For the best possible performance and the most accurate speed test, connect a computer directly to the CGA4234 using an Ethernet cable.
A wired Ethernet connection removes most Wi-Fi-related variables, including:
- Distance from the modem
- Walls and building materials
- Wireless interference
- 2.4 GHz vs. 5 GHz differences
- Your device’s Wi-Fi capabilities
- Other wireless devices competing for airtime
Once connected by Ethernet, we recommend testing with:
speed.cloudflare.com
or
fast.com
Don’t be surprised if your wired speed test is substantially faster than a test performed over Wi-Fi. Wireless speeds will always vary.
How Much Speed Do You Actually Need?
Many everyday Internet activities use surprisingly little bandwidth.
For example, an HD video stream may use around 5 Mbps, depending on the streaming provider and video quality.
That means a Wi-Fi speed test doesn’t necessarily need to show the full speed of your Internet plan for streaming, browsing, video calling and other everyday activities to work great.
Using Your Own Wi-Fi Router
Prefer your own router or mesh Wi-Fi system? No problem.
If you’d rather use equipment such as TP-Link Deco, ASUS, Ubiquiti or Eero, the CGA4234 can be placed into Bridge Mode.
Enable Bridge Mode
1 — Disconnect Ethernet Devices
Disconnect any Ethernet devices currently connected to the modem.
2 — Connect Your Router
Connect your own router to LAN Port 1 on the CGA4234.
3 — Open the Modem Interface
192.168.100.1
4 — Change the Working Mode
Navigate to:
Connection → WAN → Working Mode
Change Working Mode to:
Bridged Only
Click Save.
What Happens in Bridge Mode?
Once Bridge Mode is enabled, your own router will manage your home network and Wi-Fi.
The CGA4234 will primarily operate as the cable modem providing the Internet connection to your router.
Factory Reset & Troubleshooting
If your Technicolor CGA4234 isn’t behaving normally — including unusual Wi-Fi behaviour, connectivity issues or settings that don’t appear to be working correctly — a factory reset can provide a clean starting point.
Give Your CGA4234 a Fresh Start
A factory reset returns the modem to its original, out-of-the-box configuration and can often resolve unexpected behaviour.
1 — Keep the Modem Powered On
Make sure your CGA4234 is connected to power and turned on.
2 — Locate the RESET Hole
On the back of the CGA4234, locate the small recessed hole labelled RESET.
You’ll need a paper clip, pin or similar small object to press the reset button inside.
3 — Press & Hold for 15–25 Seconds
Carefully insert the paper clip or pin into the RESET hole and press and hold the button for approximately 15–25 seconds.
Release the button when the modem lights begin flashing or the unit begins restarting.
4 — Let the Modem Fully Restart
Allow approximately 10–15 minutes for the CGA4234 to reset, restart, obtain its configuration, check for firmware updates and reconnect to the network. The modem may restart more than once during this process.
After the Factory Reset
Once the reset is complete, the CGA4234’s original factory settings will be reinstated.
This includes the default:
- 2.4 GHz Wi-Fi network name (SSID)
- 5 GHz Wi-Fi network name (SSID)
- Wi-Fi password / Pre-Shared Key
- Router and network settings
Your original Wi-Fi information can be found on the label attached to the CGA4234.
If your phone, tablet or computer remembers your previous Wi-Fi settings, you may need to Forget This Network before reconnecting.
Apple / iPhone / iPad:
Settings → Wi-Fi → Select the network → Forget This Network
Other phones, tablets and computers provide a similar Forget Network option within their Wi-Fi settings.
Once forgotten, reconnect using the default Wi-Fi Name (SSID) and Pre-Shared Key printed on the CGA4234 label.
Because a factory reset returns the CGA4234 to its initial state, open your browser and visit the first-time setup page:
http://192.168.0.1/index.html#/captive_portal
Complete the first-time setup again. When asked whether you would like to change the default Wi-Fi settings, we recommend selecting NO.
Remember: A Factory Reset Erases Your Changes
Any customized settings — including a Wi-Fi name or password you previously created, Bridge Mode and other network settings — will be erased.
After the reset, use the default Wi-Fi name and password printed on the modem’s label to reconnect.
VPN Support
The Technicolor CGA4234 supports VPN passthrough.
Enable VPN Passthrough
1 — Log Into Your Modem
192.168.100.1
2 — Open Firewall Settings
Navigate to:
Security → Firewall → Advanced Settings
3 — Enable VPN Passthrough
Enable:
- IPSec Passthrough
- PPTP Passthrough
Click Save to apply your settings.
Technical Specifications
Technicolor CGA4234
Cable Technology
DOCSIS 3.1 — 2×2
DOCSIS 3.0 — 32×8
Chipset
Broadcom BCM3384
Ethernet
Four Gigabit Ethernet ports
Built-in Wi-Fi
2.4 GHz: 802.11n
5 GHz: 802.11ac
Power Supply
12V DC
3.5A
Still Having Trouble?
If your CGA4234 still isn’t behaving normally after completing the steps above, the Wakey Crew can help take a closer look.
Before reaching out, it helps to have the following handy:
- Which modem lights are solid or flashing
- Whether you can connect to Wi-Fi
- Whether 192.168.100.1 opens after setup is complete
- Whether you’ve already completed a factory reset
- Whether the issue also occurs when connected directly by Ethernet
Sharing those details with the Wakey Crew helps us get to the right troubleshooting step faster.